
Spring Security学习记录(二)进阶篇
1.Oauth2认证
简介
第三方认证技术方案最主要是解决认证协议的通用标准问题,因为要实现跨系统认证,各系统之间一定要遵循一定的接口协议。
OAUTH协议为用户资源提供了一个安全的,开放而又简易的标准。同时,任何第三方都可以使用OAUTH认证服务,任何服务提供商都可以实现自身的OAUTH认证服务,因而OAUTH是开放的。业界提供了OAUTH的多种实现如PHP、Javascript、Java,Ruby等各种语言开发包,大大节约了程序员的时间,因而OAUTH是简易的。互联网很多服务如Open API,很多大公司如FGoogle,Yahoo,Microsoft等都提供了OAUTH认证服务,这些都足以说明OAUTH标准逐渐成为开放资源授权的标准。
Oauth协议目前发展到2.0版本,1.0版本过于复杂,2.0版本已得到广泛应用。
Oauth2认证流程
常用术语
- 客户凭证(client Credentials):客户端的clientld和密码用于认证客户
- 令牌(tokens):授权服务器在接收到客户请求后,颁发的访问令牌
- 作用域(scopes):客户请求访问令牌时,由资源拥有者额外指定的细分权限(permission)
令牌类型
- 授权码:仅用于授权码授权类型,用于交换获取访问令牌和刷新令牌
- 访问令牌:用于代表一个用户或服务直接去访问受保护的资源
- 刷新令牌:用于去授权服务器获取一个刷新访问令牌
- BearerToken:不管谁拿到Token都可以访问资源,类似现金
- Proof of Possession(PoP) Token:可以检验client是否对Token有明确的拥有权
特点
- 优点
- 更安全,客户端不接触用户密码,服务器端更容易集中保护
- 广泛传播并被持续采用
- 短寿命和封装的Token
- 资源服务器和授权服务器解耦
- 集中式授权,简化客户端
- HTTP/JSON友好,易于请求和传递token
- 考虑多种客户端架构场景
- 客户可以具有不同的信任级别
- 缺点
- 协议框架太宽泛,造成各种实现的兼容性和互操作行差
- 不是一个认证协议,本身并不能告诉你任何用户信息
- 优点
2.Spring Security Oauth2
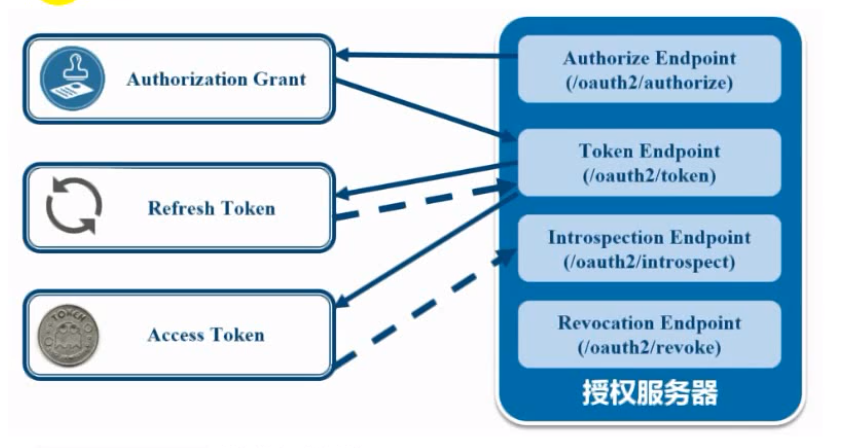
授权服务器

- Authorize Endpoint:授权端点,进行授权
- Token Endpoint:令牌端点,经过授权拿到对应的Token
- Introspection Endpoint:校验端点,检验Token的合法性
- Revocation Endpoint:撤销端点,撤销授权
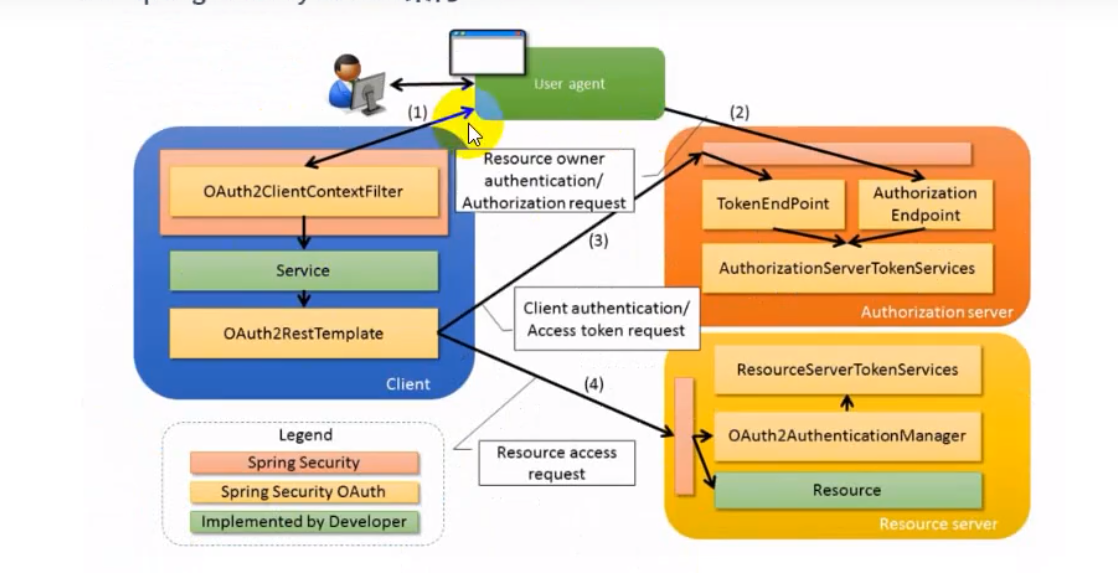
Spring Security Oauth2架构
- 流程:
- 用户访问,此时没有Token。Oauth2Rest Template会报错,这个报错信息会被Oauth2ClientContextFilter捕获并重新定向到认证服务器
- 认证服务器通过Authorization Endpoint进行授权,并通过AuthorizationServerTokenServices生成授权码并返回给客户端
- 客户端拿到授权码去认证服务器通过Token Endpoint调用AuthorizationServerTokenServices生成Token并返回给客户端
- 客户端拿到Token去资源服务器访问资源,一般会通过Oauth2AuthenticationManager调用ResourceServerTokenServices进行校验。校验通过可以获取资源。
- 流程:
3.Springsecurity Oauth2实例
3.1授权码模式
引入相关依赖
1
2
3
4
5
6
7
8
9
10
11
12
13
14
15
16
17
18
19
20
21
22
23
24
25
26
27
28
29
30
31
32
33
34
35
36
37
38
39
40
41
<properties>
<java.version>1.8</java.version>
//定义spring-cloud的版本
<spring-cloud.version>Greenwich.SR2</spring-cloud.version>
</properties>
<dependencies>
//spring-cloud整合oauth2
<dependency>
<groupId>org.springframework.cloud</groupId>
<artifactId>spring-cloud-starter-oauth2</artifactId>
</dependency>
//spring-cloud整合security
<dependency>
<groupId>org.springframework.cloud</groupId>
<artifactId>spring-cloud-starter-security</artifactId>
</dependency>
<dependency>
<groupId>org.springframework.boot</groupId>
<artifactId>spring-boot-starter-web</artifactId>
</dependency>
<dependency>
<groupId>org.springframework.boot</groupId>
<artifactId>spring-boot-starter-test</artifactId>
<scope>test</scope>
</dependency>
</dependencies>
//引入spring-cloud
<dependencyManagement>
<dependencies>
<dependency>
<groupId>org.springframework.cloud</groupId>
<artifactId>spring-cloud-dependencies</artifactId>
<version>${spring-cloud.version}</version>
//类型
<type>pom</type>
//引入的时候生效
<scope>import</scope>
</dependency>
</dependencies>
</dependencyManagement>定义User实体并实现security底层的UserDetails接口
1
2
3
4
5
6
7
8
9
10
11
12
13
14
15
16
17
18
19
20
21
22
23
24
25
26
27
28
29
30
31
32
33
34
35
36
37
38
39
40
41
42
43
44
45
46
47
public class User implements UserDetails {
private String username;
private String password;
private List<GrantedAuthority> authorities;
public User(String username, String password, List<GrantedAuthority> authorities) {
this.username = username;
this.password = password;
this.authorities = authorities;
}
@Override
public Collection<? extends GrantedAuthority> getAuthorities() {
return authorities;
}
@Override
public String getPassword() {
return password;
}
@Override
public String getUsername() {
return username;
}
@Override
public boolean isAccountNonExpired() {
return true;
}
@Override
public boolean isAccountNonLocked() {
return true;
}
@Override
public boolean isCredentialsNonExpired() {
return true;
}
@Override
public boolean isEnabled() {
return true;
}
}编写UserService来处理用户认证
1
2
3
4
5
6
7
8
9
10
11
12
13
@Service
public class UserService implements UserDetailsService {
@Autowired
private PasswordEncoder passwordEncoder;
@Override
public UserDetails loadUserByUsername(String username) throws UsernameNotFoundException {
//密码是定死的,无论输入什么用户,密码对上直接认证成功,没从数据库查
String password = passwordEncoder.encode("123456");
//将用户返回,给定admin权限
return new User(username,password, AuthorityUtils.commaSeparatedStringToAuthorityList("admin"));
}
}编写SecurityConfig配置类用来处理放行和拦截等配置
1
2
3
4
5
6
7
8
9
10
11
12
13
14
15
16
17
18
19
20
21
22
23
@Configuration
@EnableWebSecurity
public class SecurityConfig extends WebSecurityConfigurerAdapter {
@Override
protected void configure(HttpSecurity http) throws Exception {
http.authorizeRequests()
//放行 /oauth/**:放行授权服务器的所有操作
.antMatchers("/oauth/**","/login/**","/logout/**")
.permitAll()
//除了放行的请求都需要认证
.anyRequest().authenticated()
.and()
//放行所有的表单请求
.formLogin().permitAll()
.and()
//关闭csrf防护
.csrf().disable();
}
@Bean
public PasswordEncoder passwordEncoder() {
return new BCryptPasswordEncoder();
}
}配置授权服务器
1
2
3
4
5
6
7
8
9
10
11
12
13
14
15
16
17
18
19
20
21
22
23
24
25
26
@Configuration
@EnableAuthorizationServer
public class AuthorizationServerConfig extends AuthorizationServerConfigurerAdapter {
@Autowired
private PasswordEncoder passwordEncoder;
@Override
public void configure(ClientDetailsServiceConfigurer clients) throws Exception {
//为了方便直接将客户端的信息储存到内存里了
//实际开发中需要客户端来请求授权服务器
clients.inMemory()
//客户端ID
.withClient("client")
//密钥
.secret(passwordEncoder.encode("112233"))
//重定向地址
.redirectUris("http://www.baidu.com")
//授权范围
.scopes("all")
/**
* 授权类型
* authorization_code : 授权码模式
*/
.authorizedGrantTypes("authorization_code");
}
}配置资源服务器
1
2
3
4
5
6
7
8
9
10
11
12
@Configuration
@EnableResourceServer
public class ResourceServerConfig extends ResourceServerConfigurerAdapter {
@Override
public void configure(HttpSecurity http) throws Exception {
http.authorizeRequests()
.anyRequest().authenticated()
.and()
.requestMatchers()
.antMatchers("/user/**");
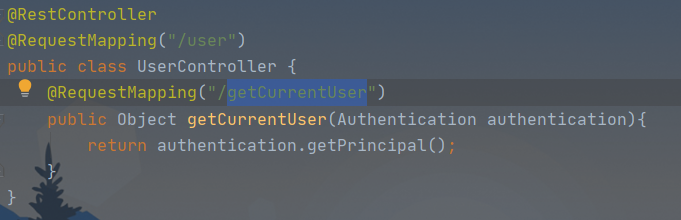
}编写controller控制器来返回资源
1
2
3
4
5
6
7
8
9
10
@RestController
@RequestMapping("/user")
public class UserController {
//资源控制器返回的资源,想获取资源需要有对应的令牌
@RequestMapping("/getCurrentUser")
public Object getCurrentUser(Authentication authentication){
return authentication.getPrincipal();
}
}测试
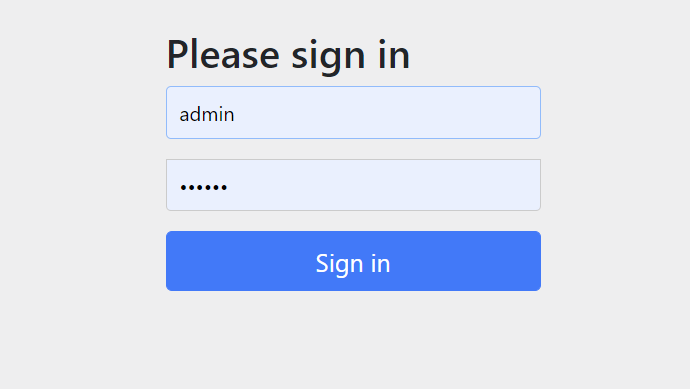
获取授权码
1
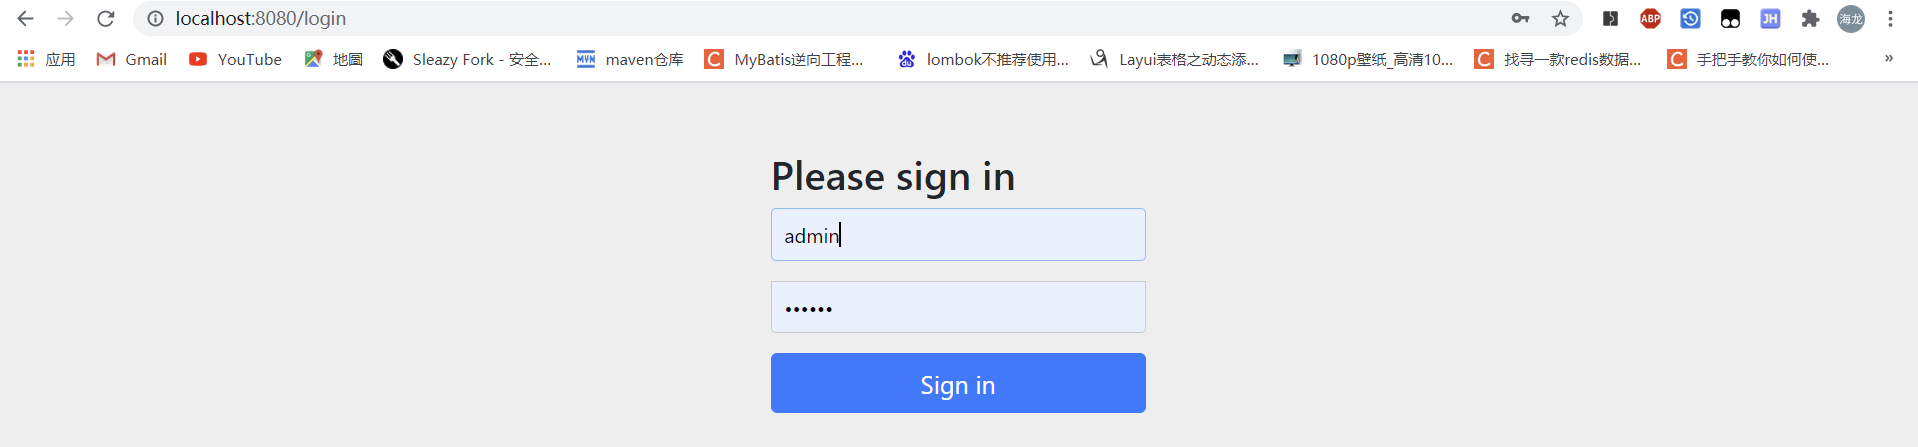
http://localhost:8080/oauth/authorize?response_type=code&client_id=client&redirect_uri=http://www.baidu.com&scope=all输入上面的url来到了security自带的登录页面
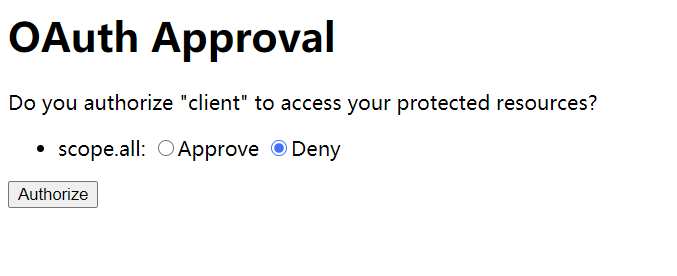
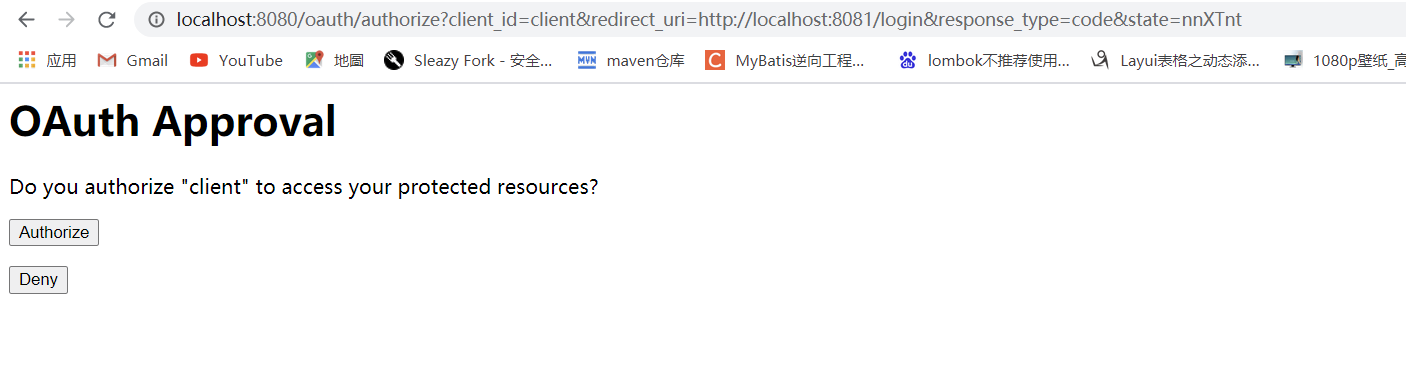
登录成功后来到授权页面 Deny:不允许,Approve:允许
授权后来到我们设定的重定向页面,后面是授权码
根据授权码获取令牌(POST请求)
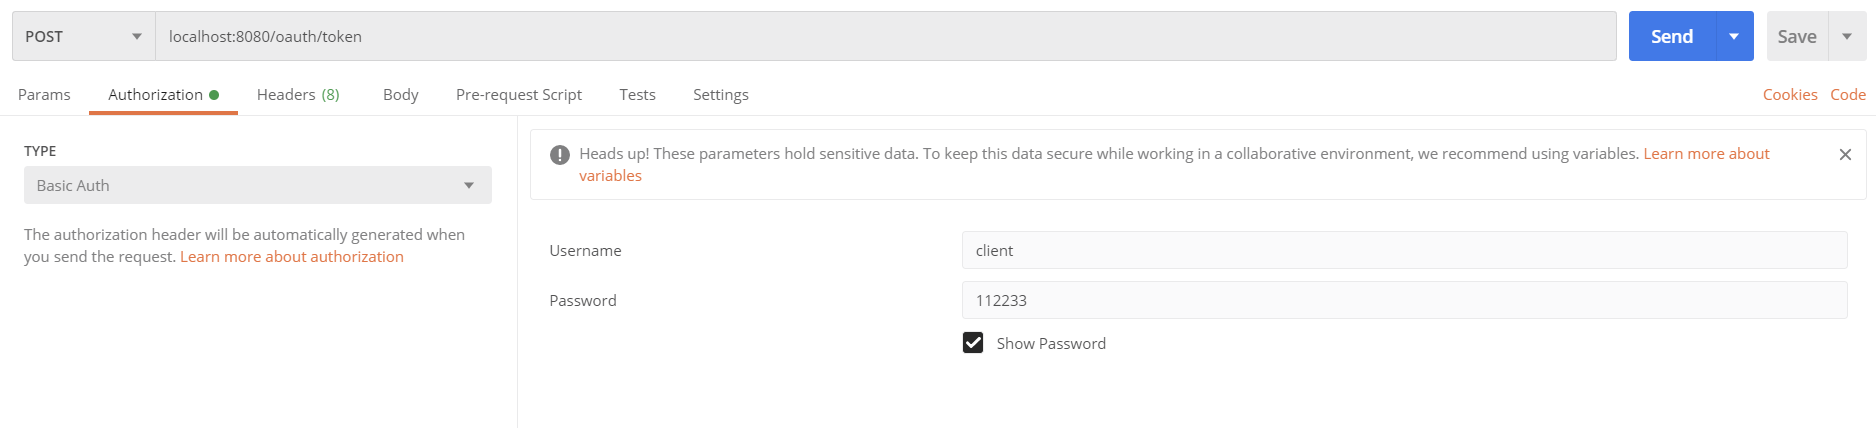
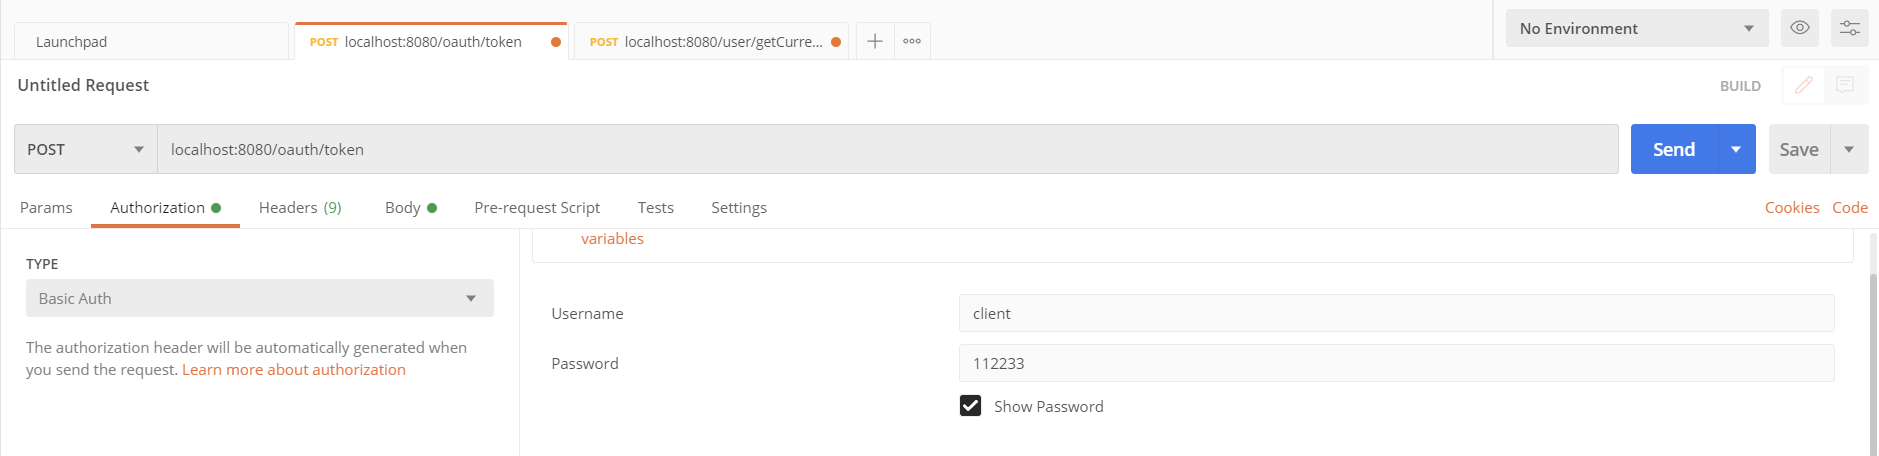
- 去到图下位置,用户名和密码是之前配置的授权服务器的客户端id和密钥
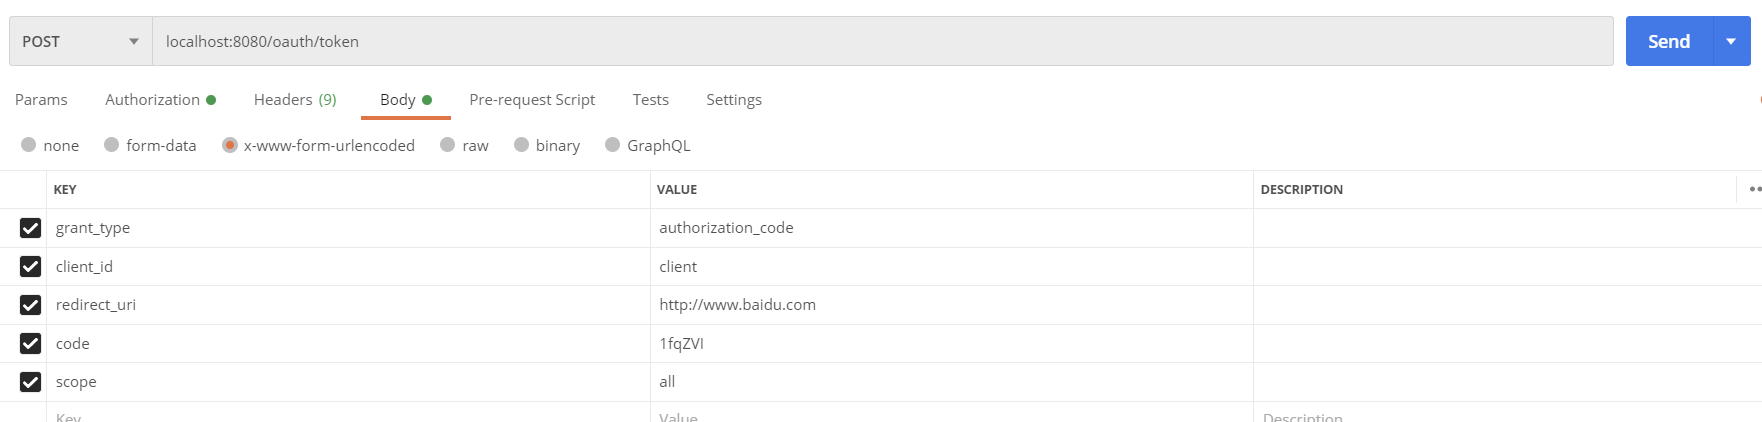
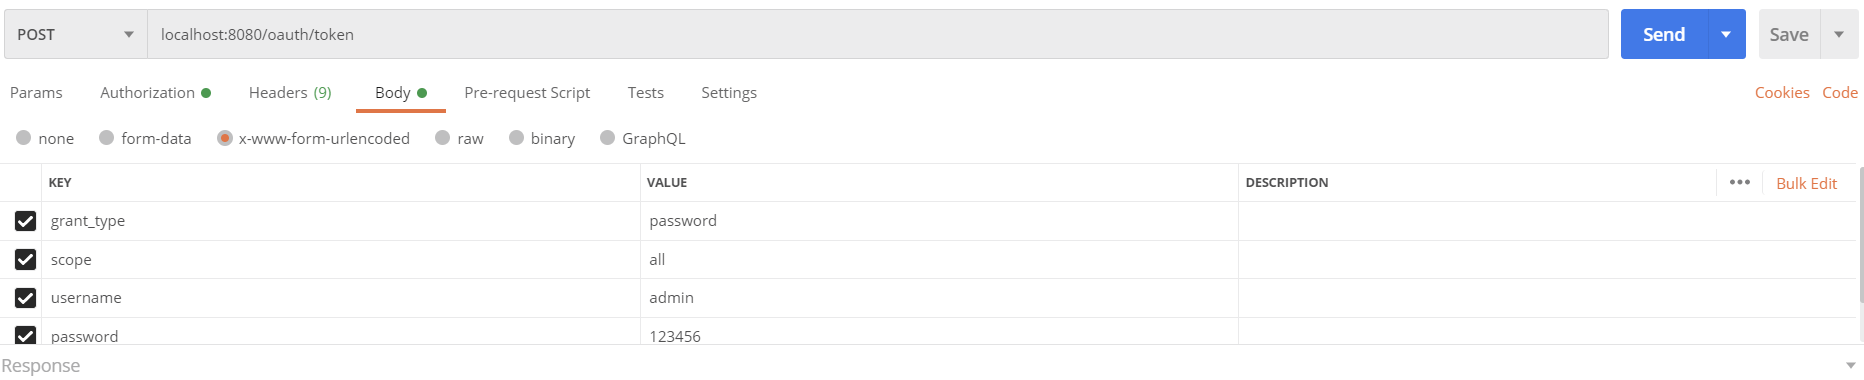
在去到Body里面选中x-www.form-urlencoded
- grant_type:授权类型,填写authorization_code,表示授权码模式
- code:授权码,就是刚刚获取的授权码,注意:授权码只能使用一次就无效了,需要重新申请
- client_id:客户端标识
- redirect_uri:申请授权码时的跳转url,一定和申请授权码时用的redirect_uri一致
- scope:授权范围
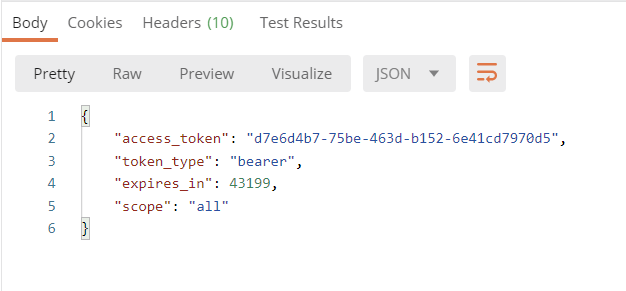
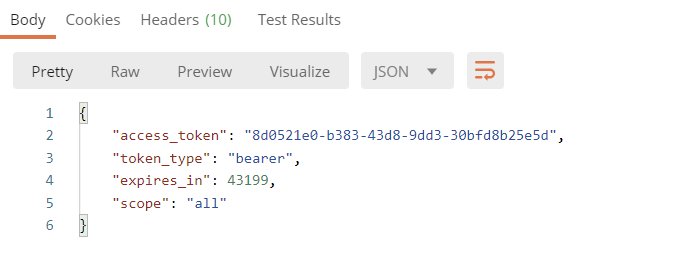
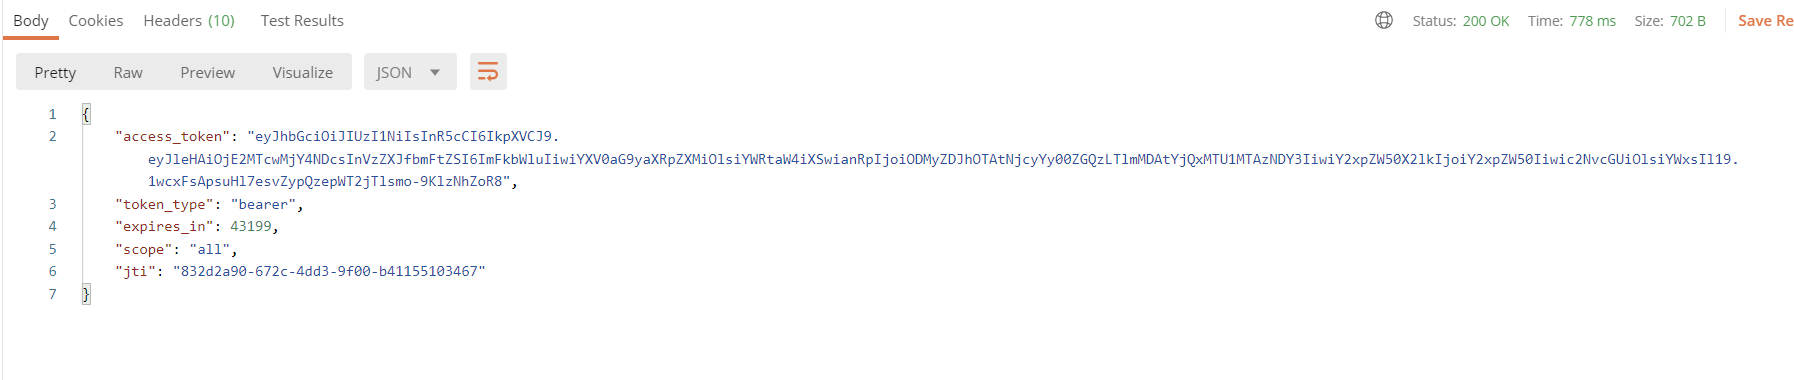
发送请求之后得到令牌
- access_token :令牌
- token_type: 令牌类型
- scope:令牌范围
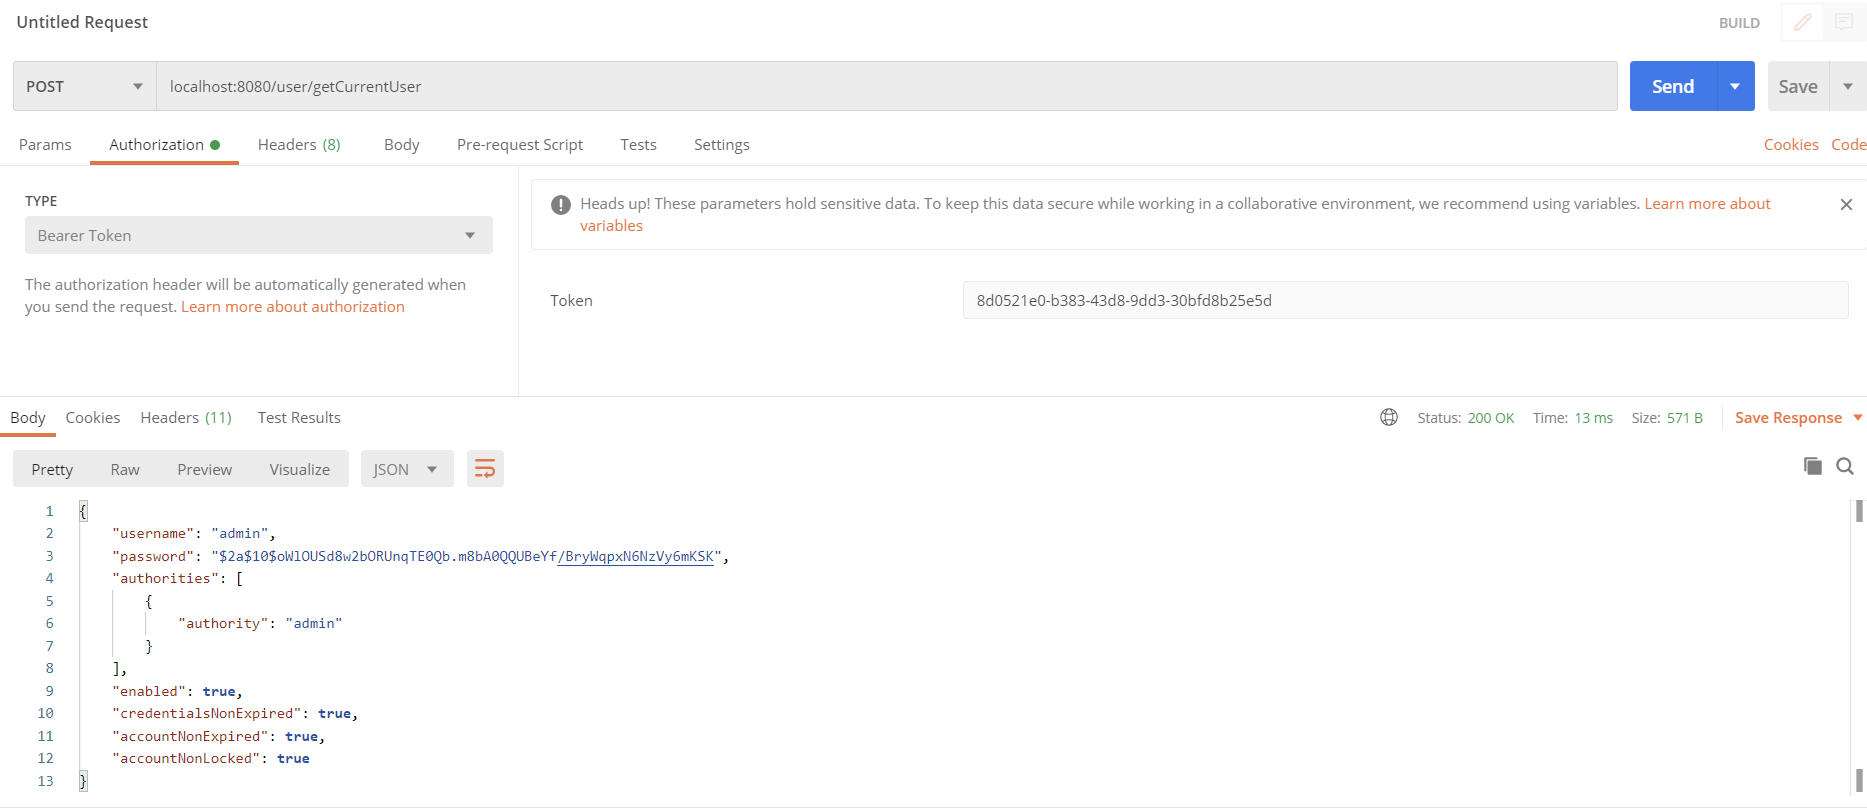
获取令牌之后就可以去访问资源了
访问的资源地址就是我们资源服务器的资源地址
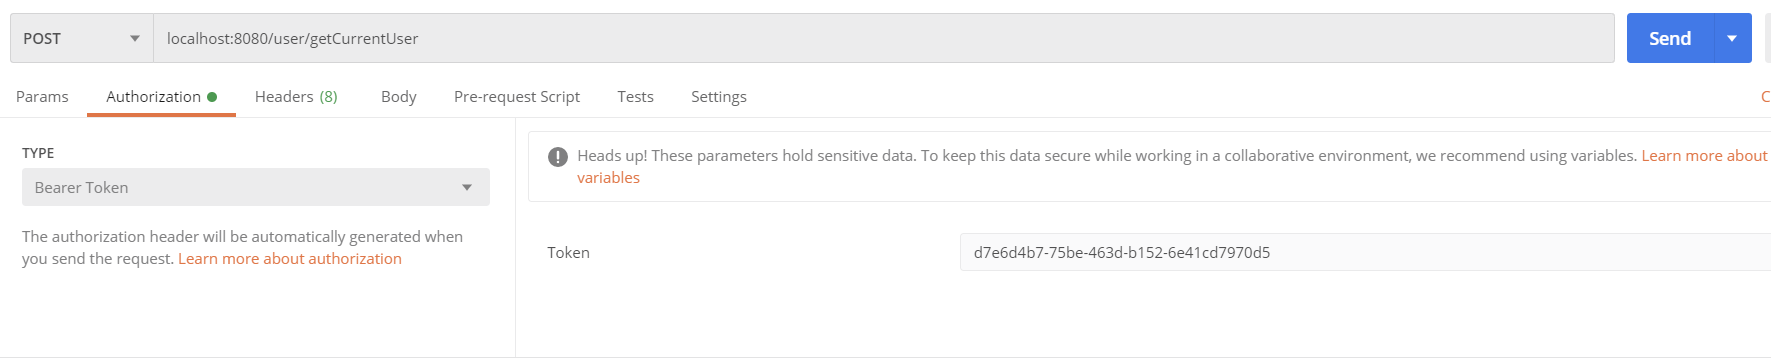
拿到刚刚得到的token放在下图位置
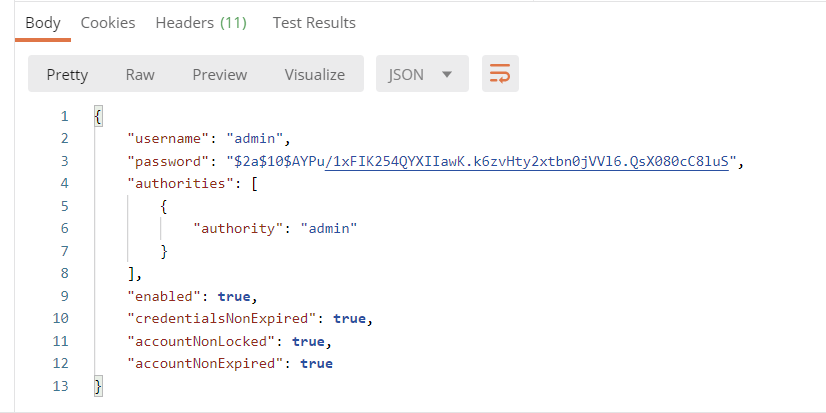
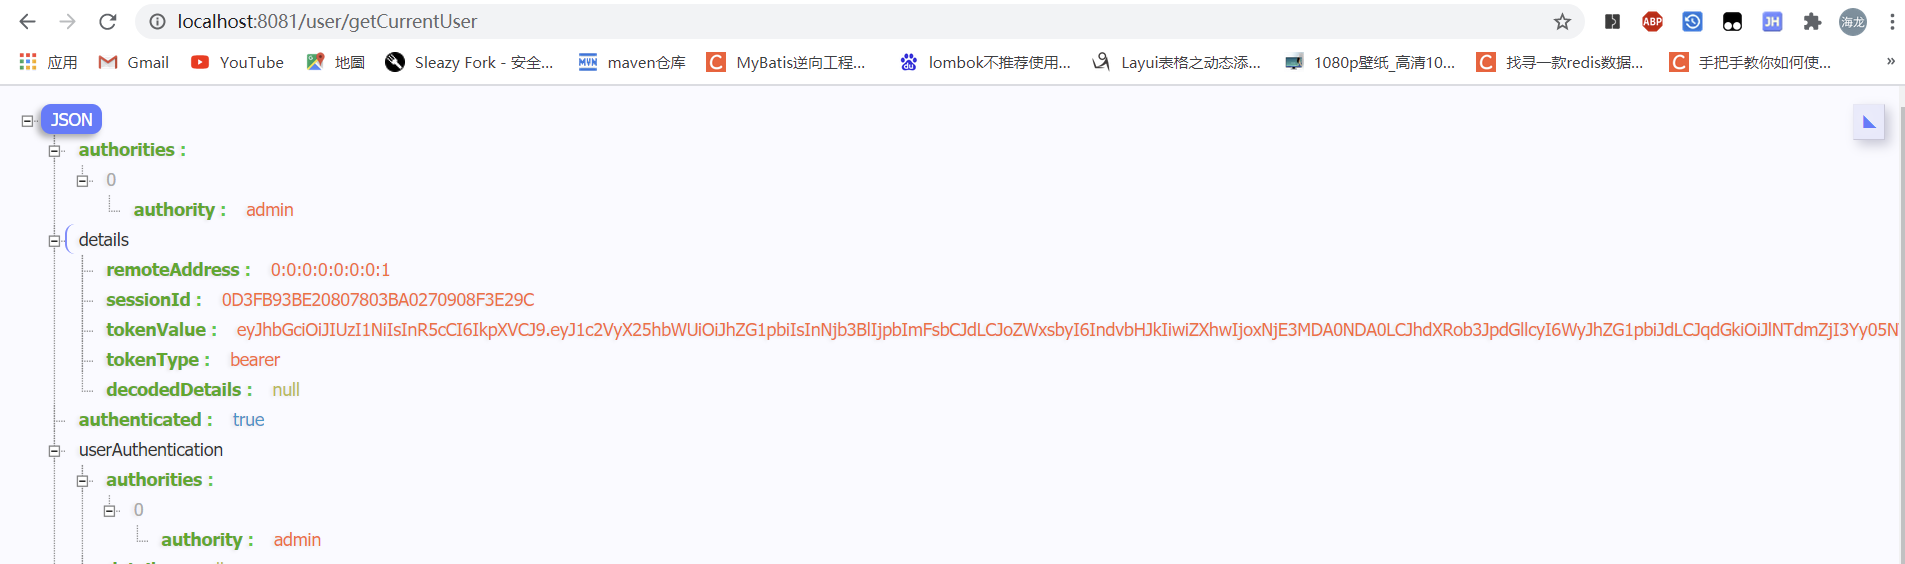
访问到的资源信息
我们把令牌改一下,然后就会报错,说我们的令牌是一个非法令牌,令牌不对是获取不了资源的


3.2.密码模式
密码模式比授权码模式简单很多,我们在授权码模式的基础上稍作调整就好了
在SecurityConfig配置类新注册一个AuthenticationManager
1
2
3
4
@Bean
public AuthenticationManager authenticationManager() throws Exception {
return super.authenticationManager();
}
授权服务器里面新增一个实现方法
1
2
3
4
5
6
/**
* 授权类型
* authorization_code : 授权码模式
* password : 密码模式
*/
.authorizedGrantTypes("authorization_code","password");测试
还是在下图位置输入我们的客户端id和密钥
然后在body中输入授权类型、授权范围、用户名和密码
grant_type:授权类型,填写password,表示密码模式
scope:授权范围
username : 自己定义的用户名
password : 密码
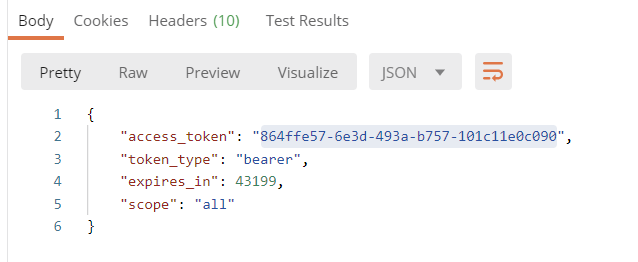
发送请求之后获得令牌
使用刚刚得到的令牌去获取资源,步骤跟授权码模式一样
3.3将token存储到redis中
引入redis相关依赖
1
2
3
4
5
6
7
8<dependency>
<groupId>org.springframework.boot</groupId>
<artifactId>spring-boot-starter-data-redis</artifactId>
</dependency>
<dependency>
<groupId>org.apache.commons</groupId>
<artifactId>commons-pool2</artifactId>
</dependency>编写redis相关的配置
1
2
3
4
spring.redis.port=6379
spring.redis.host=127.0.0.1
spring.redis.password=123456
编写RedisConfig配置类
1
2
3
4
5
6
7
8
9
10
11
@Configuration
public class RedisConfig {
@Autowired
private RedisConnectionFactory redisConnectionFactory;
@Bean
public TokenStore redisTokenStore(){
return new RedisTokenStore(redisConnectionFactory);
}
}在授权服务器中将Token令牌保存到Redis中
1
2
3
4
5
6
7
8
9
10
11
12
@Autowired
//用Qualifier指定,不然找不到
@Qualifier("redisTokenStore")
private TokenStore tokenStore;
@Override
public void configure(AuthorizationServerEndpointsConfigurer endpoints) throws Exception {
endpoints.authenticationManager(authenticationManager)
.userDetailsService(userService)
//将Token令牌保存到redis中
.tokenStore(tokenStore);
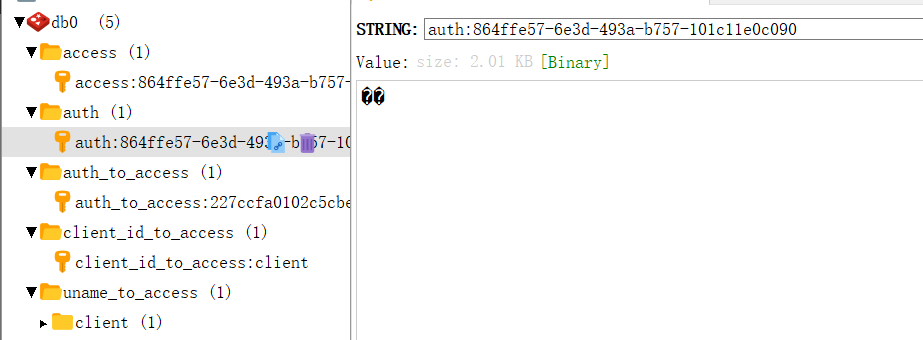
}测试,还是使用密码模式发送请求,请求后可以看到redis将Token令牌存起来了
4.JWT
常见的认证机制(详情百度)
- HTTP Basic Auth
- Cookie Auth
- OAuth
- Token Auth
什么是JWT
- JSON Web Token(JWT)是一个开放的行业标准(RFC 7519),他定义了一种简介的、自包含的协议格式,用于在通信双方传递json对象,传递的信息经过数字签名可以被验证和信任。JWT可以使用HMAC算法或使用RSA的公钥/私钥对来签名,防止被篡改。
- 官网:https://jwt.io/
- 标准:https://tools.ietf.org/html/rfc7519
JWT令牌的优点:
- jwt基于json,非常方便解析。
- 可以在令牌中自定义丰富的内容,易扩展。
- 通过非对称加密算法及数字签名技术,JWT防止篡改,安全性高
- 资源服务使用JWT可不依赖认证服务即可完成授权。
缺点:
JWT令牌较长,占存储空间比较大。
JWT组成
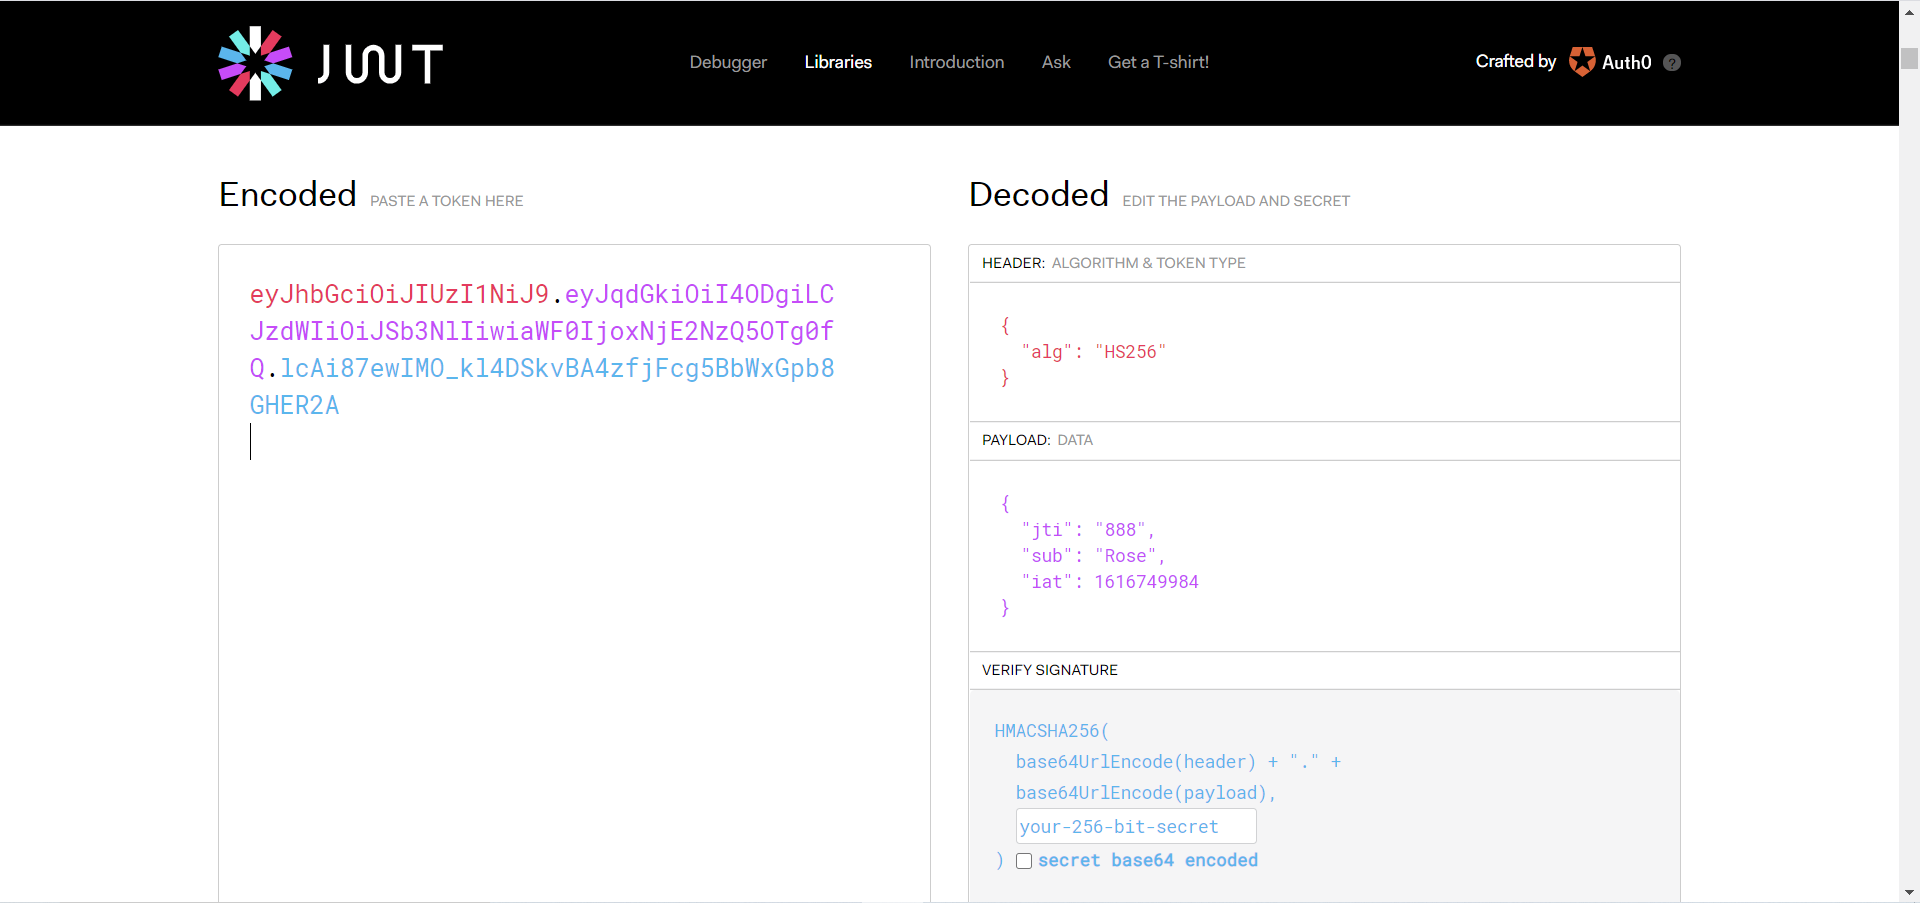
一个JWT实际上就是一个字符串,它由三部分组成,头部、载荷与签名
头部(Header)
头部用于描述关于该JWT的最基本的信息,例如其类型(即JWT)以及签名所使用的算法(如HMAC SHA256或RSA)等,这也可以被表示成一个JSON对象。
1
2
3
4
{
"alg": "HS256",
"typ": "JWT"
}- typ:是类型
- alg:签名的算法,这里使用的是HS256算法
负载(Payload)
第二部分是负载,就是存放有效信息的地方。这些有效信息包含三个部分
标准中注册的声明(建议但不强制使用)
- iss:jwt的签发者
- sub:jwt所面向的用户
- aud:接受jwt的一方
- exp:jwt的过期时间,这个过期时间必须要大于签发时间
- nbf:定义在什么时间之前,该jwt都是不可用的
- iat:jwt的签发时间
- jti:jwt的唯一身份标识,主要用来作为一次性token,从而回避重放攻击
公共的声明
公共的声明可以添加任何的信息,一般添加用户的相关信息或其他业务需要的必要信息,但不建议添加敏感信息,因为该部分在客户端可以解密。
私有的声明
私有声明是提供者和消费者所共同定义的声明,一般不建议存放敏感信息,因为base64是对称解密的,意味着该部分信息可以归类为明文信息
这个指的就是自定义的claim。比如下面那个举例中的name都属于自定的claim。这些claim跟JWT标准规定的claim区别在于:JWT规定的claim,JWT的接收方在拿到JWT之后,都知道怎么对这些标准的claim进行验证(还不知道是否能够验证)而private claims不会验证,除非明确告诉接收方要对这些claim进行验证以及规则才行。
1
2
3
4
5{
"sub": "1234567890"
"name": "John Doe"
"iat": 1516239022
}- 其中sub是标准的声明,name是自定义的声明(公共或私有的)
签证、签名(signature)
jwt的第三部分是一个签证信息,这个签证信息有三部分组成
- header(base64后的)
- payload(base64后的)
secret(盐,一定要保密)
注意:secret是保存在服务器端的,jwt的签发生成也是在服务器端的,secret就是用来进行jwt的签发和jwt的验证,所有,他就是你服务器端的私钥,在任何场景都不应该流露出去。一旦客户端得知这个secret,那就意味着客户端是可以自我签发jwt了。
5.JJWT
什么是JJWT
JJWT是一个提供到端的JWT创建和验证的Java库,永远免费和开源(Apache License,版本2.0)JJWT很容易使用和理解。它被设计成一个以建筑为中心的流畅界面,隐藏了它的大部分复杂性。
快速入门
导入依赖
1
2
3
4
5<dependency>
<groupId>io.jsonwebtoken</groupId>
<artifactId>jjwt</artifactId>
<version>0.9.0</version>
</dependency>编写测试类
1
2
3
4
5
6
7
8
9
10
11
12
13
14
15
16
17
18
19
20
21@SpringBootTest
public class JjwtDemoApplicationTests {
@Test
public void contextLoads() {
JwtBuilder jwtBuilder = Jwts.builder()
//唯一ID{“id”:“888”}
.setId("888")
//接受的用户{“sub”:“Rose”}
.setSubject("Rose")
//签发时间{“iat”:“时间”}
.setIssuedAt(new Date())
//签名算法,及密钥
.signWith(SignatureAlgorithm.HS256,"abcd");
//签发token
String token = jwtBuilder.compact();
System.out.println(token);
}
}测试结果
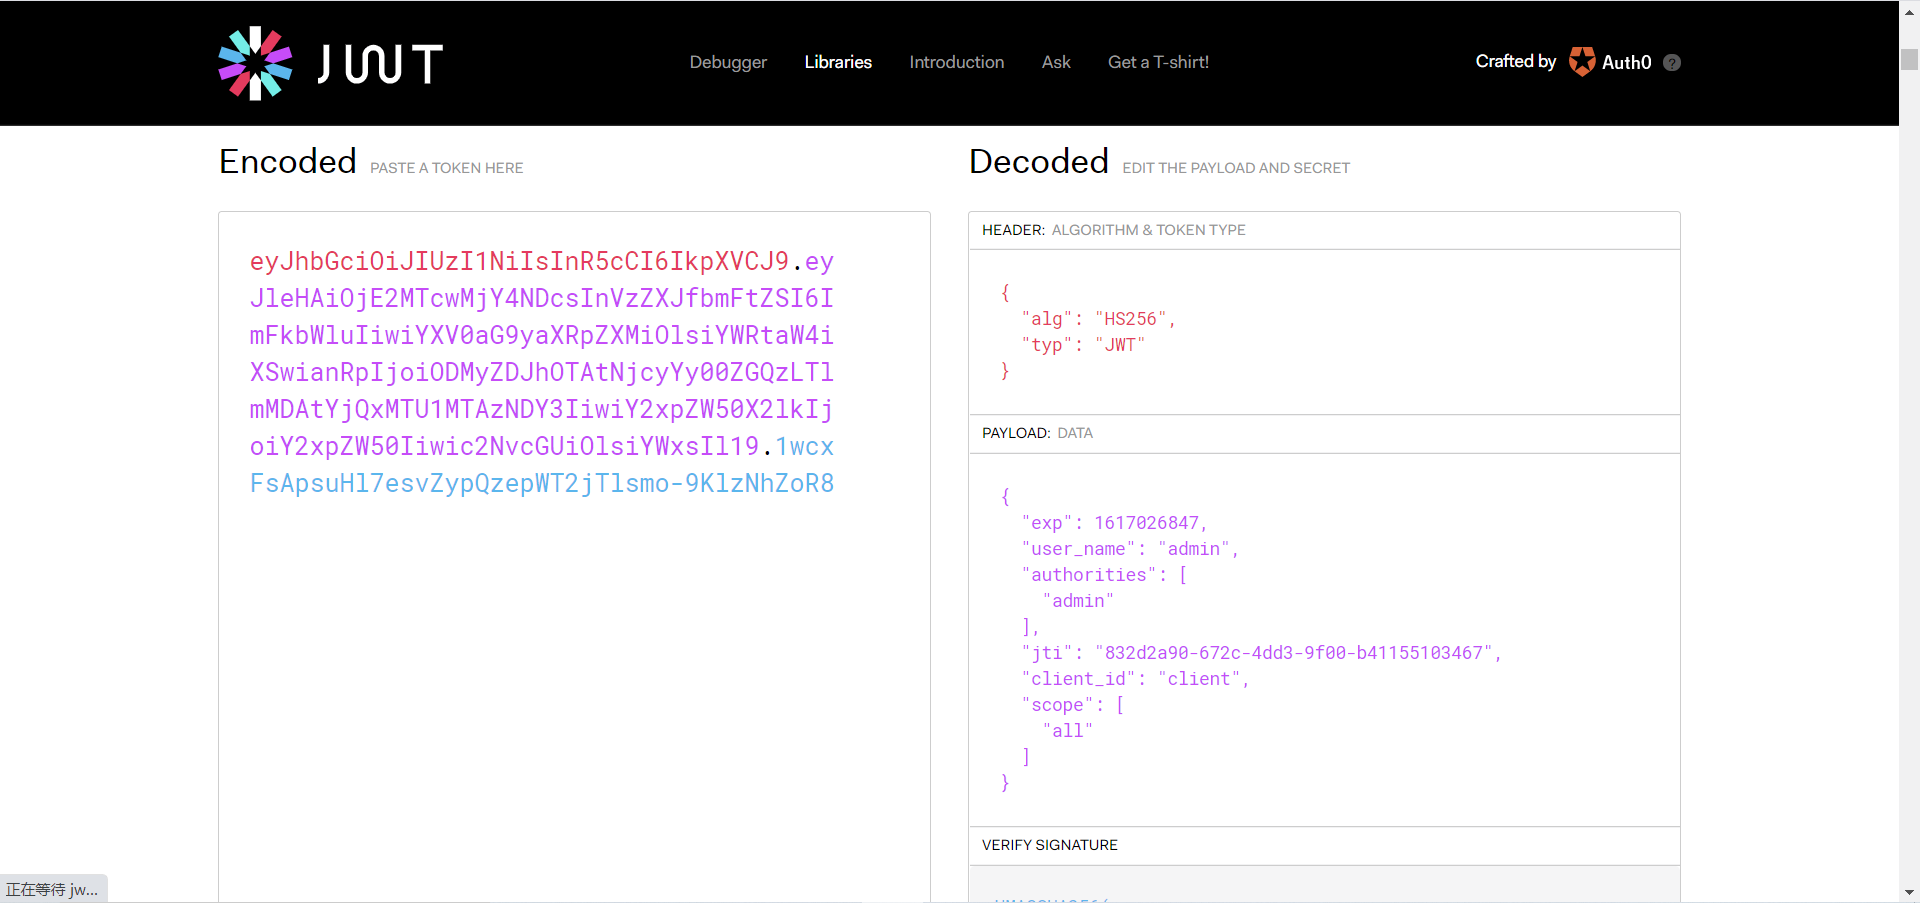
- 在官网解析令牌

- 也可以自己编写代码解析
1
2
3
4
5
6
System.out.println("=======================");
String[] split = token.split("\\.");
System.out.println(Base64Codec.BASE64.decodeToString(split[0]));
System.out.println(Base64Codec.BASE64.decodeToString(split[1]));
//这个会乱码,为了安全考虑
System.out.println(Base64Codec.BASE64.decodeToString(split[2]));
- 解析效果 
解析token
1
2
3
4
5
6
7
8
9
10
11
12
13
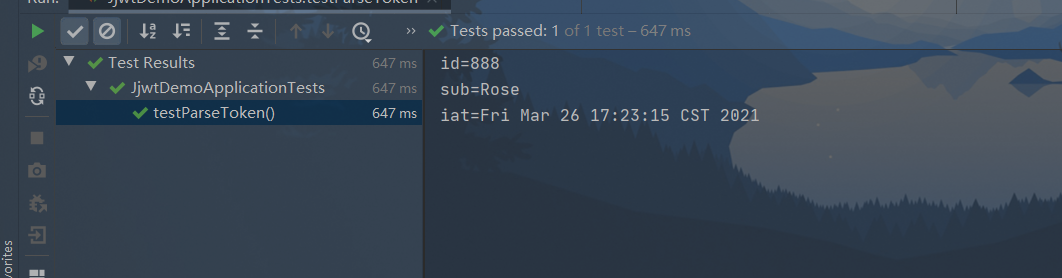
14@Test
public void testParseToken(){
String token = "eyJhbGciOiJIUzI1NiJ9." +
"eyJqdGkiOiI4ODgiLCJzdWIiOiJSb3NlIiwiaWF0IjoxNjE2NzUwNTk1fQ." +
"rWfl8Fxzz0Lgh0qr-nchqiRpv89jRA_SXmuWLsxL-zk";
//解析token,获取Claims,jwt中荷载申明的对象
Claims claims = (Claims) Jwts.parser()
.setSigningKey("abcd")
.parse(token)
.getBody();
System.out.println("id="+claims.getId());
System.out.println("sub="+claims.getSubject());
System.out.println("iat="+claims.getIssuedAt());
}效果:
token过期校验
1
2
3
4
5
6
7
8
9
10
11
12
13
14
15
16
17
18
19
20
21
22
23
24
25
26
27
28
29
30
31
32
33
34
35
36
37
38
39@Test
public void contextLoadsExp() {
long data = System.currentTimeMillis();
long exp = data+60*1000;
JwtBuilder jwtBuilder = Jwts.builder()
//唯一ID{“id”:“888”}
.setId("666")
//接受的用户{“sub”:“Rose”}
.setSubject("Rose")
//签发时间{“iat”:“时间”}
.setIssuedAt(new Date())
//设置失效时间
.setExpiration(new Date(exp))
//签名算法,及密钥
.signWith(SignatureAlgorithm.HS256,"abcd");
//签发token
String token = jwtBuilder.compact();
System.out.println(token);
System.out.println("=======================");
String[] split = token.split("\\.");
System.out.println(Base64Codec.BASE64.decodeToString(split[0]));
System.out.println(Base64Codec.BASE64.decodeToString(split[1]));
//这个会乱码,为了安全考虑
System.out.println(Base64Codec.BASE64.decodeToString(split[2]));
}
@Test
public void testParseTokenExp(){
String token = "eyJhbGciOiJIUzI1NiJ9." +
"eyJqdGkiOiI2NjYiLCJzdWIiOiJSb3NlIiwiaWF0IjoxNjE2OTgwODU1LCJleHAiOjE2MTY5ODA5MTV9." +
"n9j9sft8JhaZc_qLBroiQHP5-TZQwzu409nIRMEdtAQ";
Claims claims = (Claims) Jwts.parser()
.setSigningKey("abcd")
.parse(token)
.getBody();
System.out.println("id="+claims.getId());
System.out.println("sub="+claims.getSubject());
System.out.println("iat="+claims.getIssuedAt());
}
当我们测试发现多了一个失效时间
然后过一分钟解析token的时候,报错说token已经失效(前面一个时间是失效时间,第二个时间是我们解析他的时间)


自定义Claims
1
2
3
4
5
6
7
8
9
10
11
12
13
14
15
16
17
18
19
20
21
22
23
24
25
26
27
28
29
30
31
32
33
34
35
36
37
38
39
40
41
42
43
44
45
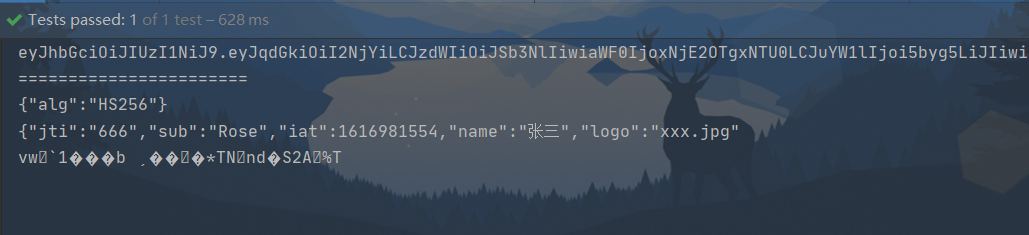
46@Test
public void contextLoadsEnhancer() {
long data = System.currentTimeMillis();
long exp = data+60*1000;
JwtBuilder jwtBuilder = Jwts.builder()
//唯一ID{“id”:“888”}
.setId("666")
//接受的用户{“sub”:“Rose”}
.setSubject("Rose")
//签发时间{“iat”:“时间”}
.setIssuedAt(new Date())
//设置失效时间
// .setExpiration(new Date(exp))
//自定义claim
.claim("name","张三")
.claim("logo","xxx.jpg")
//以map的方式自定义Claim
// .addClaims(Map);
//签名算法,及密钥
.signWith(SignatureAlgorithm.HS256,"abcd");
//签发token
String token = jwtBuilder.compact();
System.out.println(token);
System.out.println("=======================");
String[] split = token.split("\\.");
System.out.println(Base64Codec.BASE64.decodeToString(split[0]));
System.out.println(Base64Codec.BASE64.decodeToString(split[1]));
//这个会乱码,为了安全考虑
System.out.println(Base64Codec.BASE64.decodeToString(split[2]));
}
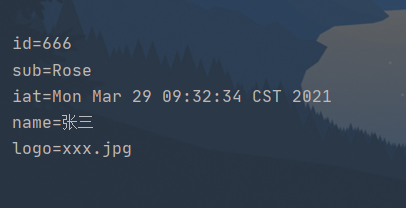
@Test
public void testParseTokenEnhancer(){
String token = "eyJhbGciOiJIUzI1NiJ9." +
"eyJqdGkiOiI2NjYiLCJzdWIiOiJSb3NlIiwiaWF0IjoxNjE2OTgwODU1LCJleHAiOjE2MTY5ODA5MTV9." +
"n9j9sft8JhaZc_qLBroiQHP5-TZQwzu409nIRMEdtAQ";
Claims claims = (Claims) Jwts.parser()
.setSigningKey("abcd")
.parse(token)
.getBody();
System.out.println("id="+claims.getId());
System.out.println("sub="+claims.getSubject());
System.out.println("iat="+claims.getIssuedAt());
System.out.println("name="+claims.get("name"));
System.out.println("logo="+claims.get("logo"));
}- 自定义claim测试
- 自定义claim解析
6.SpringSecurityOauth2集成JWT
基于SpringSecurityOauth2实例的基础上新增一个JwtTokenStoreConfig配置类
1
2
3
4
5
6
7
8
9
10
11
12
13
14
15
16@Configuration
public class JwtTokenStoreConfig {
@Bean
public TokenStore jwtTokenStore(){
return new JwtTokenStore(jwtAccessTokenConverter());
}
@Bean
public JwtAccessTokenConverter jwtAccessTokenConverter(){
JwtAccessTokenConverter jwtAccessTokenConverter = new JwtAccessTokenConverter();
//设置jwt密钥
jwtAccessTokenConverter.setSigningKey("test-key");
return jwtAccessTokenConverter;
}
}在授权服务器将其转化成JwtToken
1
2
3
4
5
6
7
8
9
10
11
12
13
14@Autowired
@Qualifier("jwtTokenStore")
TokenStore tokenStore;
@Autowired
JwtAccessTokenConverter jwtAccessTokenConverter;
@Override
public void configure(AuthorizationServerEndpointsConfigurer endpoints) throws Exception {
endpoints.authenticationManager(authenticationManager)
.userDetailsService(userService)
//accessToken 转成JWTToken
.tokenStore(tokenStore)
.accessTokenConverter(jwtAccessTokenConverter);
}测试结果
这串Token相比之前的token长了很多
6.1.扩展jwt中的存储内容
编写一个JwtTokenEnhancerConfig编写自定义的存储内容
1
2
3
4
5
6
7
8
9
10@Configuration
public class JwtTokenEnhancerConfig implements TokenEnhancer {
@Override
public OAuth2AccessToken enhance(OAuth2AccessToken oAuth2AccessToken, OAuth2Authentication oAuth2Authentication) {
Map<String,Object> map = new HashMap<>();
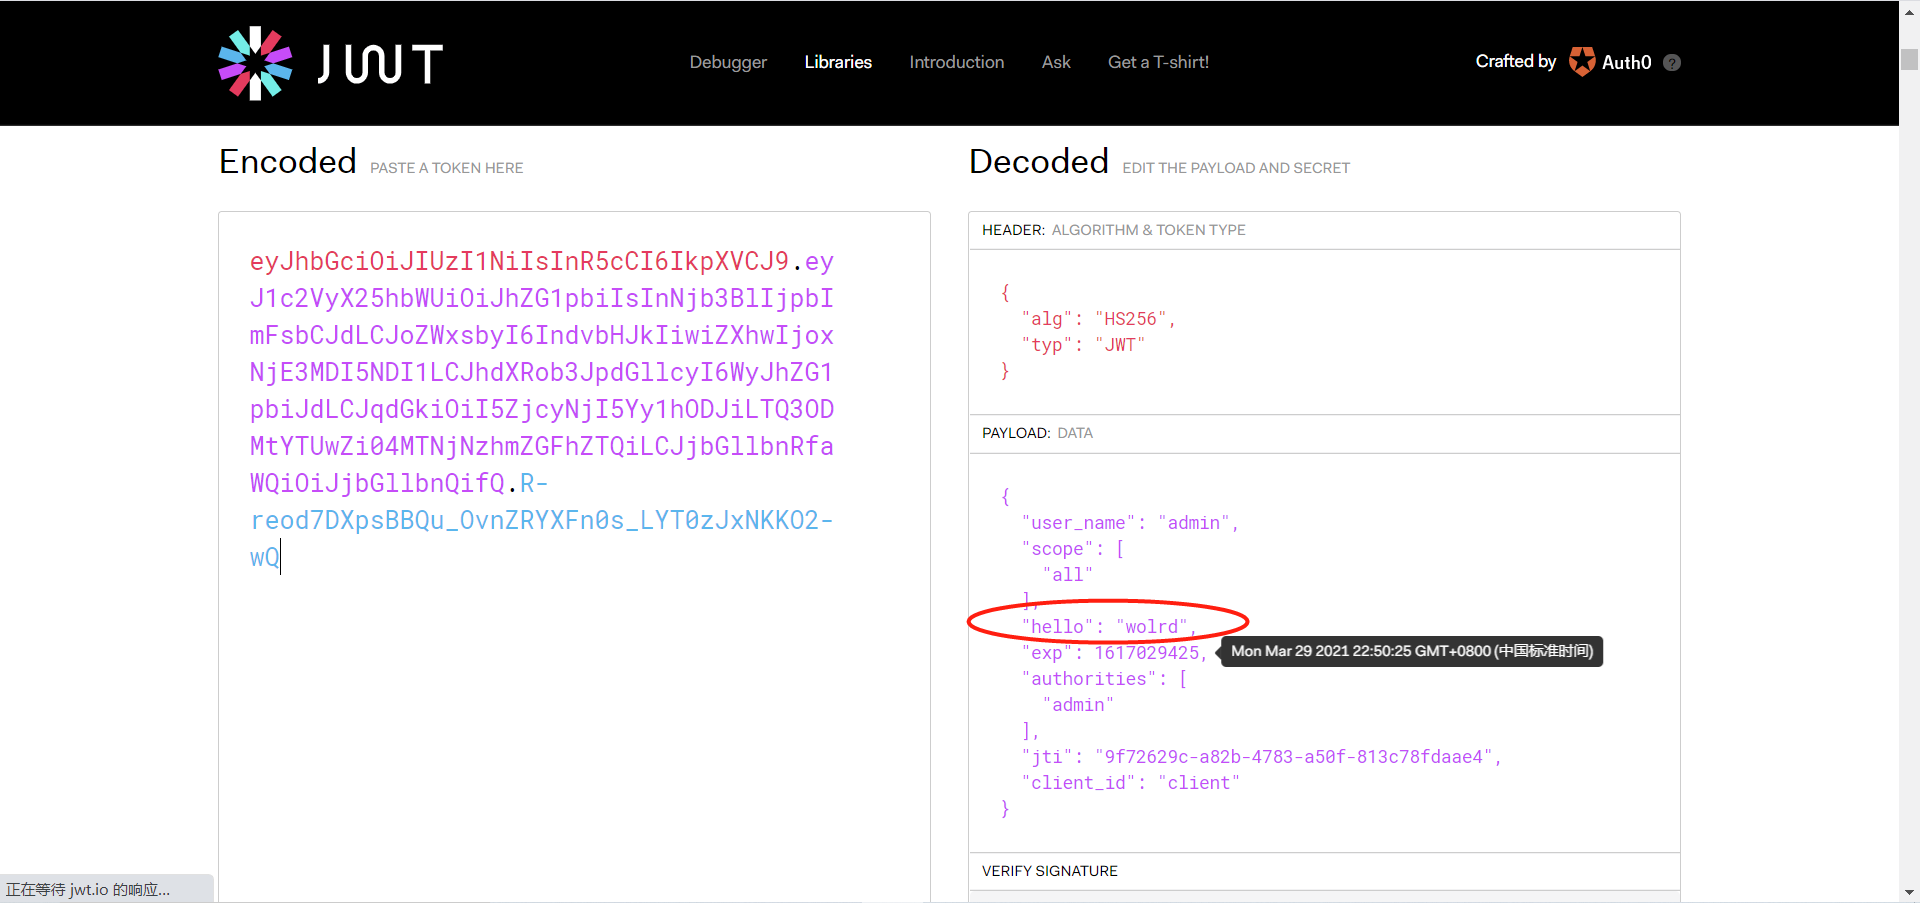
//添加自定义的存储内容
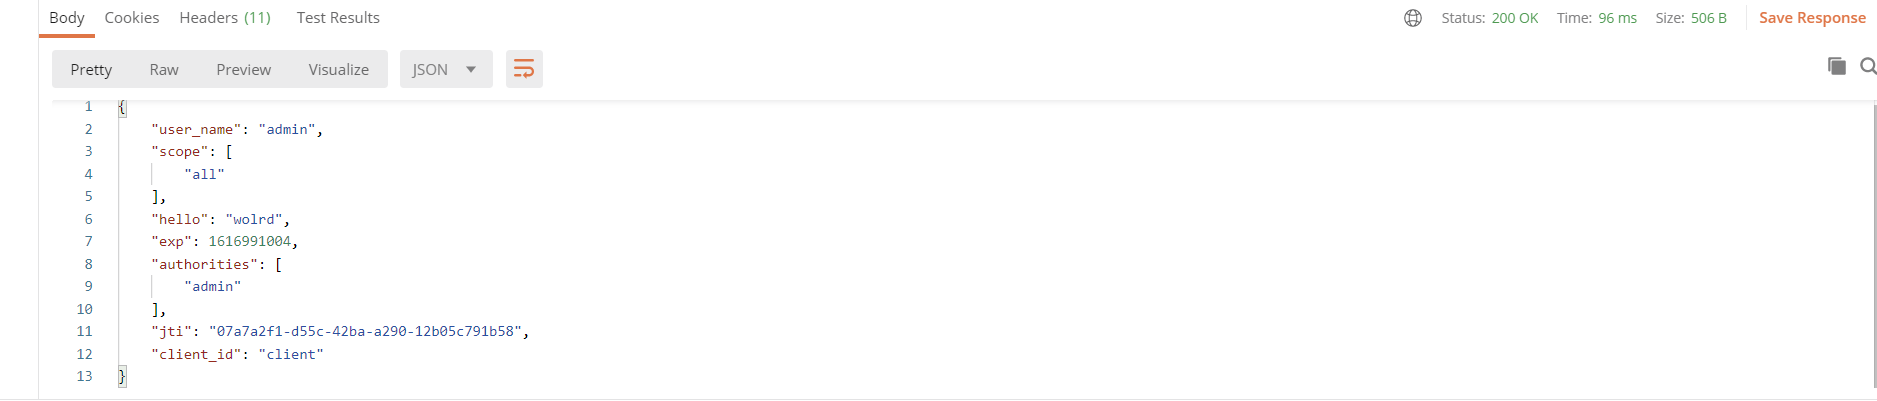
map.put("hello","wolrd");
((DefaultOAuth2AccessToken)oAuth2AccessToken).setAdditionalInformation(map);
return oAuth2AccessToken;
}在授权服务器中将自定义的存储内容添加到JwtToken中
1
2
3
4
5
6
7
8
9
10
11
12
13
14
15
16
17
18
19
20
21@Autowired
JwtAccessTokenConverter jwtAccessTokenConverter;
@Autowired
JwtTokenEnhancerConfig jwtTokenEnhancerConfig;
@Override
public void configure(AuthorizationServerEndpointsConfigurer endpoints) throws Exception {
//设置jwt增强内容
TokenEnhancerChain chain = new TokenEnhancerChain();
List<TokenEnhancer> delegates = new ArrayList<>();
delegates.add(jwtTokenEnhancerConfig);
delegates.add(jwtAccessTokenConverter);
chain.setTokenEnhancers(delegates);
endpoints.authenticationManager(authenticationManager)
.userDetailsService(userService)
//accessToken 转成JWTToken
.tokenStore(tokenStore)
.accessTokenConverter(jwtAccessTokenConverter)
.tokenEnhancer(chain)
;
}测试结果
6.2.解析Jwt令牌
直接在controller里面解析
1
2
3
4
5
6
7
8
9
10
11
12
13
14
15
16@RestController
@RequestMapping("/user")
public class UserController {
@RequestMapping("/getCurrentUser")
public Object getCurrentUser(Authentication authentication,
HttpServletRequest request){
//获取请求头为Authorization的值
String header = request.getHeader("Authorization");
//截取令牌
String token = header.substring(header.lastIndexOf("bearer")+7);
return Jwts.parser()
.setSigningKey("test-key".getBytes(StandardCharsets.UTF_8))
.parseClaimsJws(token)
.getBody();
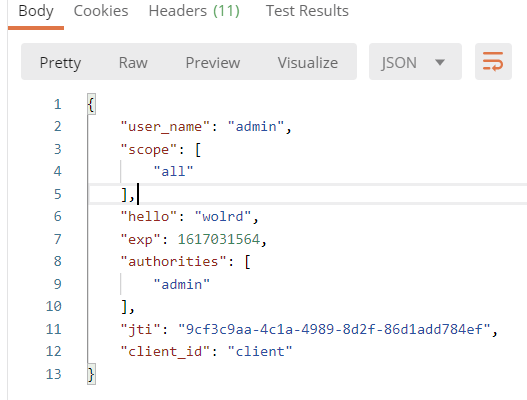
}测试结果
先获取JwtToken
在根据令牌获取解析的JwtToken数据
- 注意这个不要填写之前需要,现在不用了
然后把刚刚拿到的JwtToken放入请求的头部信息中
解析后的数据,可以看到我们解析的数据和官网是一样的
)


 )
)
6.3.设置JwtToken过期时间和刷新令牌
在授权服务器中设置JwtToken失效时间
1
2
3
4
5//授权范围
.scopes("all")
//设置失效时间
.accessTokenValiditySeconds(60)
一分钟后提示令牌失效,失效原因:令牌已过期
设置刷新令牌
由于令牌失效又要从头走一遍获取令牌的流程比较复杂,我们可以使用刷新令牌
在授权服务器中设置刷新令牌
1
2
3
4
5
6
7/**
* 授权类型
* authorization_code : 授权码模式
* password : 密码模式
* refresh_token : 刷新令牌
*/
.authorizedGrantTypes("authorization_code","password","refresh_token");设置刷新令牌的有效时间
1
2//刷新令牌失效时间
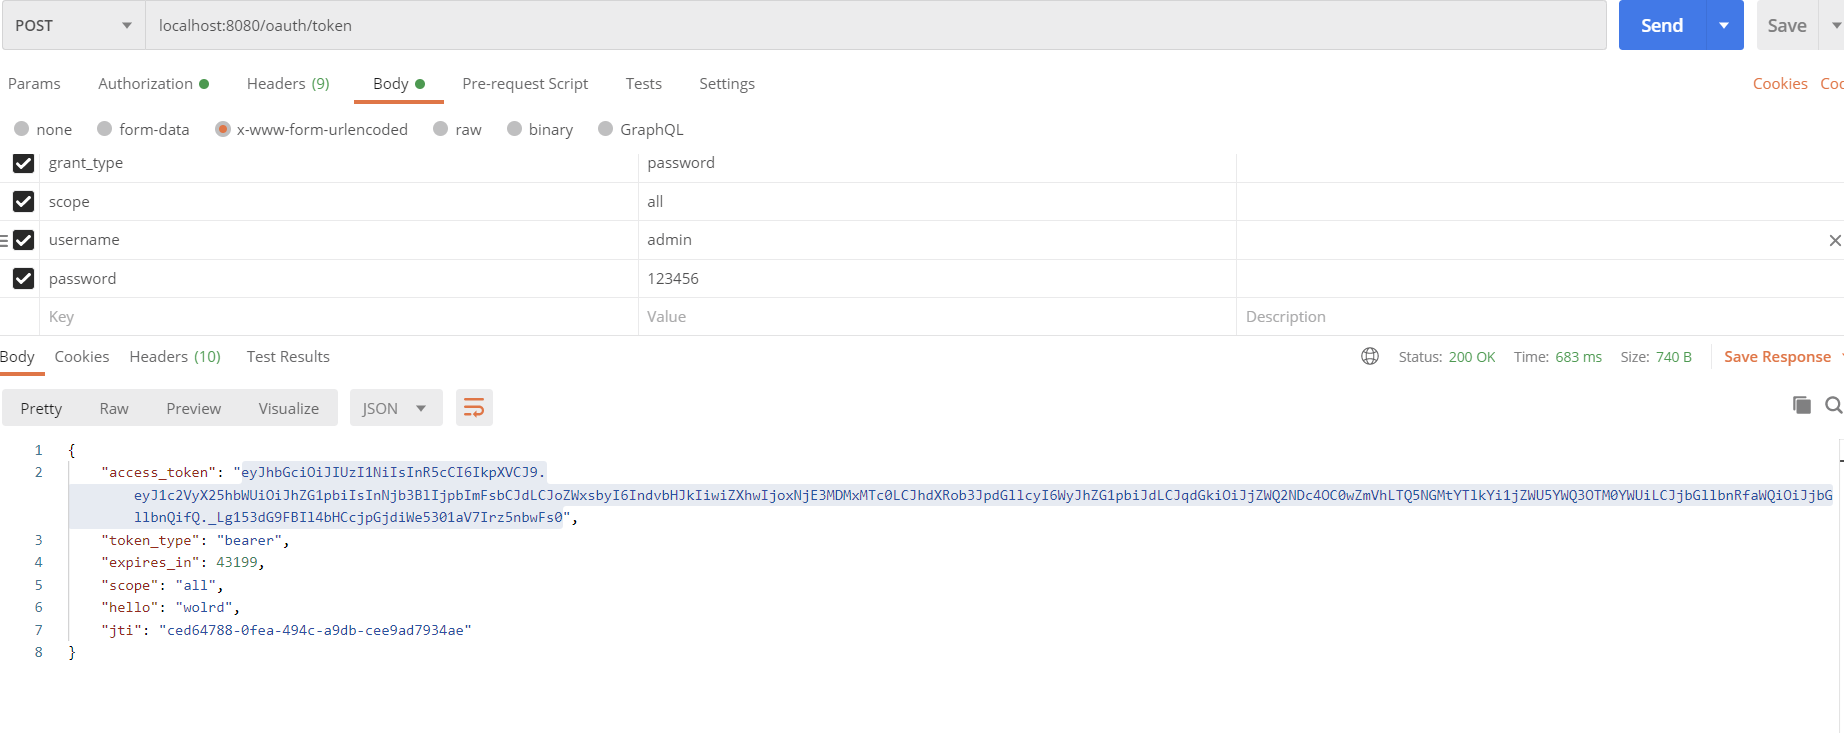
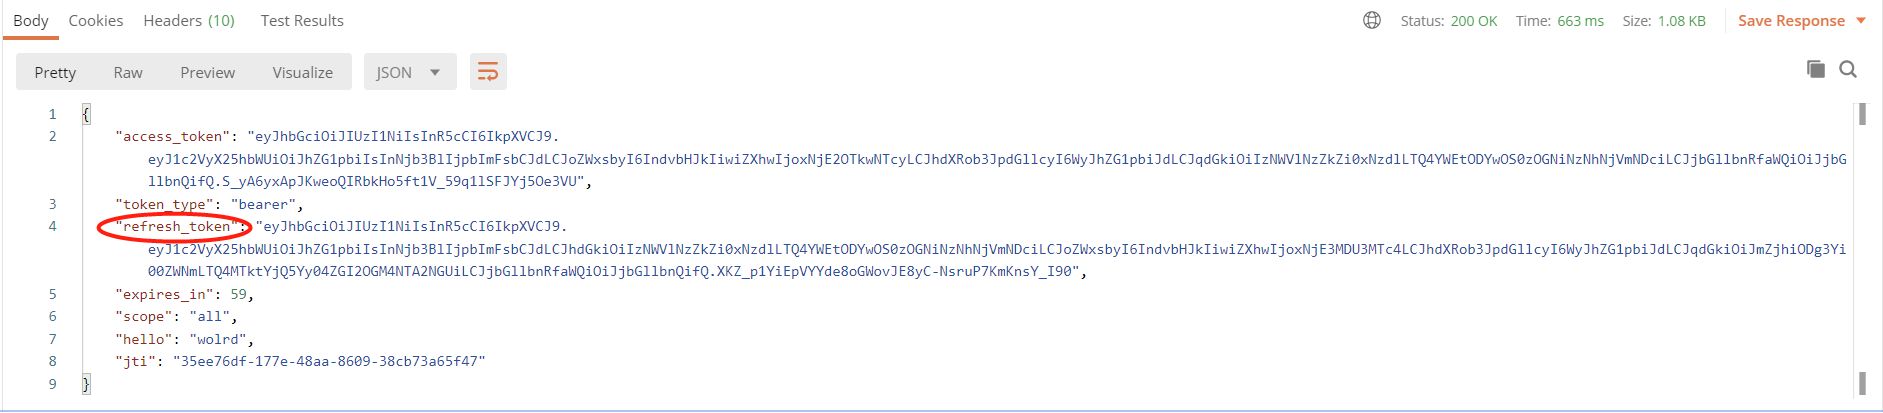
.refreshTokenValiditySeconds(66666)我们可以看到访问时多了一个刷新令牌
一分钟过后令牌过期
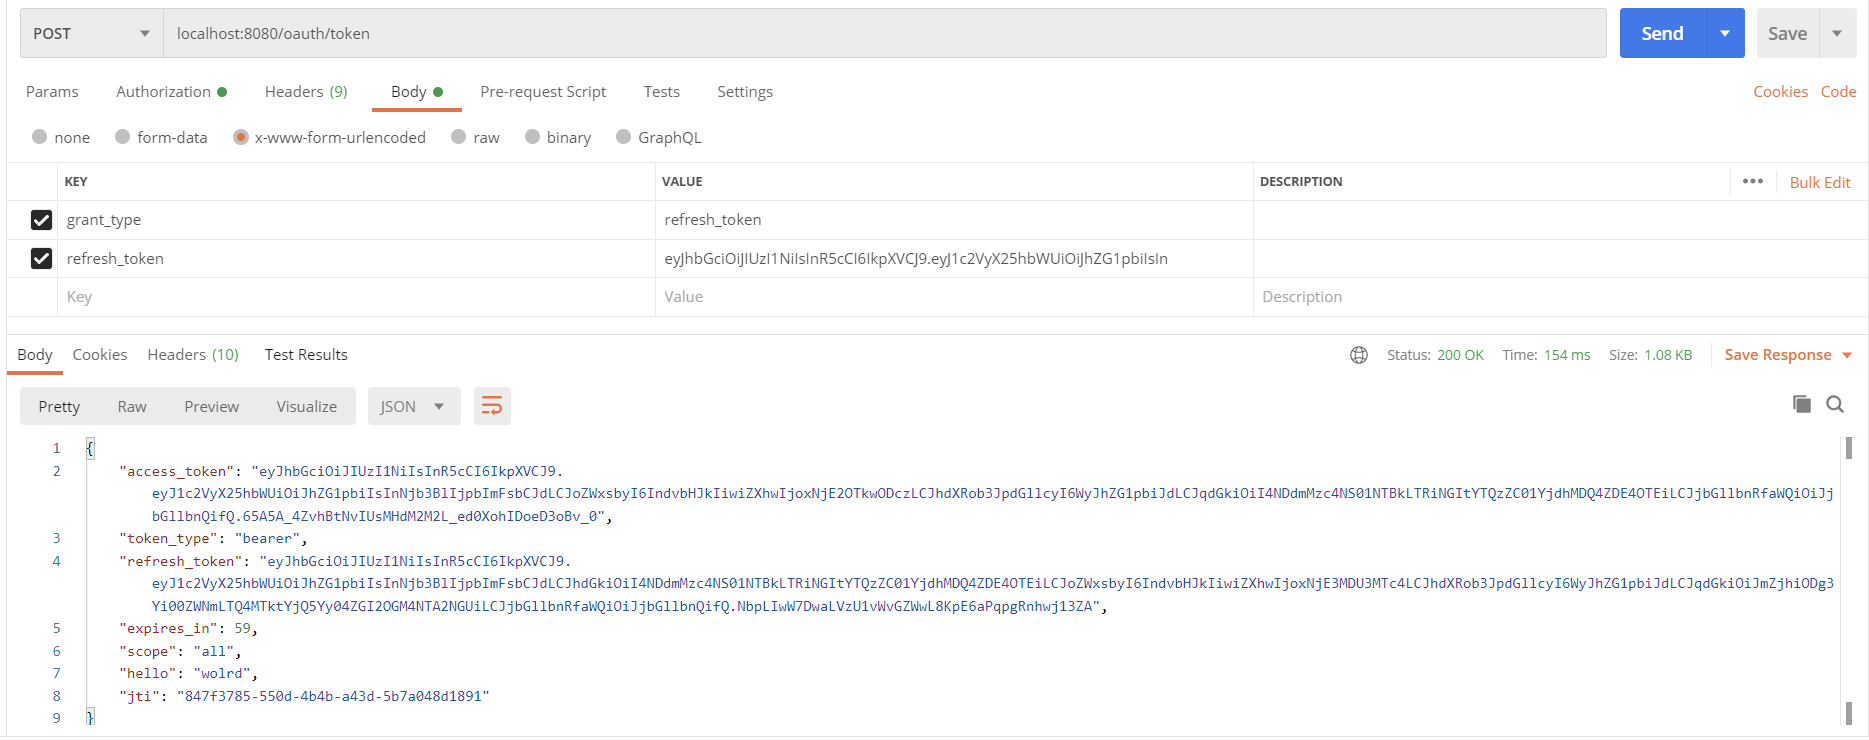
使用刷新令牌去获取新的令牌
使用刷新令牌后重新得到的令牌又有一分钟的有效时间


7.SpringSecurityOauth2集成SSO(单点登录)
创建一个客户端sso-demo
导入依赖
1
2
3
4
5
6
7
8
9
10
11
12
13
14
15
16
17
18
19
20
21
22
23
24
25
26
27
28
29
30
31
32
33
34
35
36
37
38
39
40
41
42
43
44<properties>
<java.version>1.8</java.version>
<spring-cloud.version>Greenwich.SR2</spring-cloud.version>
</properties>
<dependencies>
<dependency>
<groupId>org.springframework.cloud</groupId>
<artifactId>spring-cloud-starter-oauth2</artifactId>
</dependency>
<dependency>
<groupId>org.springframework.cloud</groupId>
<artifactId>spring-cloud-starter-security</artifactId>
</dependency>
<dependency>
            <groupId>io.jsonwebtoken</groupId>
            <artifactId>jjwt</artifactId>
            <version>0.9.0</version>
        </dependency>
<dependency>
<groupId>org.springframework.boot</groupId>
<artifactId>spring-boot-starter-web</artifactId>
</dependency>
<dependency>
<groupId>org.springframework.boot</groupId>
<artifactId>spring-boot-starter-test</artifactId>
<scope>test</scope>
</dependency>
</dependencies>
<dependencyManagement>
<dependencies>
<dependency>
<groupId>org.springframework.cloud</groupId>
<artifactId>spring-cloud-dependencies</artifactId>
<version>${spring-cloud.version}</version>
<type>pom</type>
<scope>import</scope>
</dependency>
</dependencies>
</dependencyManagement>
编写配置文件
1
2
3
4
5
6
7
8
9
10
11
12#不能跟服务端一样
server.port=8081
#因为我们可能会有很多个客户端,防止Cookie冲突,冲突会导致验证不通过
server.servlet.session.cookie.name=OAUTH2CLIENT01
#授权服务器地址
oauth2-server-rul: http://localhost:8080
#与授权服务器对应的地址
security.oauth2.client.client-id=client
security.oauth2.client.client-secret=112233
security.oauth2.client.user-authorization-uri=${oauth2-server-rul}/oauth/authorize
security.oauth2.client.access-token-uri=${oauth2-server-rul}/oauth/token
security.oauth2.resource.jwt.key-uri=${oauth2-server-rul}/oauth/token_key在启动类添加开启sso的注解
1
2
3
4
5
6
7
8
9
10@SpringBootApplication
//开启单点登录
@EnableOAuth2Sso
public class SsoDemoApplication {
public static void main(String[] args) {
SpringApplication.run(SsoDemoApplication.class, args);
}
}编写controller测试
1
2
3
4
5
6
7
8@RestController
@RequestMapping("/user")
public class SsoController {
@RequestMapping("/getCurrentUser")
public Object getCurrentUser(Authentication authentication){
return authentication;
}
}服务端还是跟之前一样,只要添加以下代码
在授权服务器里重写一个方法
1
2
3
4
5@Override
public void configure(AuthorizationServerSecurityConfigurer security) throws Exception {
//获取密钥必须要身份验证,单点登录必须要配置
security.tokenKeyAccess("isAuthenticated()");
}更改授权后的重定向地址
1
2
3.redirectUris("http://localhost:8081/login")
//自动授权
.autoApprove(true)
测试效果
当我们访问http://localhost:8081/user/getCurrentUser就会跳转到服务端的登录地址
当我们登录后会跳转到授权页面,开启自动授权的话就直接授权,跳过此页面
授权后我们来到客户端的(http://localhost:8081/user/getCurrentUser)getCurrentUser方法里
- Post title:Spring Security学习记录(二)进阶篇
- Post author:周瑜
- Create time:2021-03-29 15:55:09
- Post link:https://xinblog.github.io/2021/03/29/Security2-md/
- Copyright Notice:All articles in this blog are licensed under BY-NC-SA unless stating additionally.