一.容器功能
1.底层注解@Configuration详解
@Configuration:告诉springboot这是一个配置类 == 配置文件 , 配置类本身也是组件
@Bean:给容器中添加组件。以方法名作为组件id,返回类型是组件类型,返回的值就是组件在容器中的实列 ==
proxyBeanMethods:代理bean的方法
实战作用
- 配置类组件之间无依赖关系用Lite模式加速容器启动过程,减少判断
- 配置类组件之间有依赖关系,方法会被调用得到之前单实例组件,用Full模式
1 | |
1 | |
2.@Import注解
1 | |
3.@Conditional
@Conditional:条件装配,满足Conditional指定的条件,则进行组件注入
4.@ImportResource
@ImportResource(“classpath:beans.xml”)导入spring的配置文件,使其生效
5.配置绑定
(1)@Component + @ConfigurationProperties
1 | |
(2)@ConfigurationProperties + @EnableConfigurationProperties
1 | |
二.自动配置原理
1.引导加载自动配置类
(1)SpringBootApplication由下面几个注解组成
1 | |
(1.1).@SpringBootConfiguration
@Configuration : 代表当前是一个配置类
(1.2)@ComponentScan
指定扫描哪些,spring注解;
(1.3)@EnableAutoConfiguration
1 | |
(1.3.1) @AutoConfigurationPackage
自动配置包?指定了默认的包规则
1 | |
(1.3.2)@Import({AutoConfigurationImportSelector.class})
1 | |
1 | |

2.按需开启自动配置项
虽然我们130个场景的所有自动配置启动的时候默认全部加载。
按照条件装配规则(@Conditional),最终会按需加载。
3.修改默认配置
SpringBoot默认会在底层配置好所有的组件。但是如果用户自己配置了以用户的优先。
1 | |
总结:
SpringBoot先加载所有的自动配置类 xxxxAutoConfiguration
每个自动配置类按照条件进行生效,默认都会绑定配置文件指定的值。 xxxxProperties里面拿 ,xxxxproperties和配置文件进行了绑定
生效的配置类会给容器中装配很多组件
只要容器中有这些组件,相当于这些功能有了
只要用户有自己配置的,就以用户的优先
定制化配置
- 用户直接自己@Bean替换底层的组件
- 用户去看这个组件是获取的配置文件什么值就去修改
xxxxAutoConfiguration —>组件 —>xxxxProperties里面拿值 —>application.properties
4.最佳实践
引入场景依赖
查看自动配置了哪些
- 自己分析,引入场景对应的自动配置一般都生效了
- 配置文件中debug=true开启自动配置报告。Negative(不生效)\Positive(生效)
是否需要修改
参照文档修改配置项
自定义加入或者替换组件
- @Bean、@Component。。。
自定义器 xxxxCustomizer
……
三、开发小技巧
1.Lombok
简化JavaBean的开发,先导入依赖:
1 | |
然后在Idea里下载Lombok插件就可以使用了
1 | |
2.dev-tools
1 | |
Ctrl+F9
四、配置文件
springboot使用一个全局的配置文件,配置文件名是固定的,有两种格式
1.application.properties
2.application.yml
配置文件的作用:修改spring boot自动配置的默认值;spring boot在底层都给我们配置好的;
yaml语法
1.基本语法
K:(空格)V : 表示一对键值对(空格必须有);
以空格的缩进来控制层级关系;只有是左对齐的一列数据,都是一个层级的;属性和值也是大小写敏感的;
2.值的写法
字面量:普通的值(数字,字符串,布尔)
k: v : 字面直接来写;
字符串默认不用加上单引号或者双引号
“”:双引号; 不会转义字符串里面的特殊字符;特殊字符会作为本身想要表达的意思
name:”zhangsan \n lisi”:输出zhangsan 换行 lisi
‘’:单引号;会转义特殊字符,特殊字符最终只是一个普通的字符串数据
name:”zhangsan \n lisi”:输出zhangsan \n lisi
对象、Map(属性和值)(键值对):
k: v :在下一行来写对象的属性和值的关系;注意缩进;对象还是k:v的方式
1 | |
行内写法:
1 | |
数组(List,Set)
用-值表示数组中的一个元素
1 | |
行内写法
1 | |
3.配置文件注入
application.yml:
1 | |
JavaBean:
@configurationProperties:将配置文件中的每一个属性值,映射到这个实体类中
prefix=”person” : 将配置文件中person下面的所以属性进行一一映射
1 | |
配置文件处理器,以后编写配置就有提示
1 | |
application.properties中文乱码问题
打开设置 进入 file encoding 更改Properties Files 的编码为UTF-8,并且勾上Transparent native-to-ascii conversation
@ConfigurationProperties和@value的区别
| @ConfigurationProperties | @Value | |
|---|---|---|
| 功能 | 批量注入配置文件中的属性 | 一个个值定 |
| 松散语法 | 支持 | 不支持 |
| SpEL | 不支持 | 支持 |
| JSR303数据检验 | 支持 | 不支持 |
| 复杂类型封装 | 支持 | 不支持 |
配置文件yml还是properties他们都能获取到值
如果说,我们只是在某个业务逻辑中获取配置文件中的某项值,使用@Value
如果我们专门写了一个JavaBean来和配置文件进行映射,我们就直接使用ConfigurationProperties;
3.配置文件数据检验
@Validated
4.@PropertySource/ImportResource
@PropertySource:加载指定的配置文件;
1 | |
@ImportResource:导入Spring的配置文件,让配置文件里面的内容生效;
1 | |
SpringBoot推荐给容器中添加组件的方式;推荐使用全注解的方式
1.配置类======Spring配置文件
2.使用@Bean给容器中添加组件
1 | |
5.配置文件占位符
1.随机数
1 | |
2.占位符获取之前配置的值,如果没有是可以用:指定默认值
1 | |
6.Profile
1.多Profile文件
我们在主配置文件编写的时候,文件名可以是application-{Profile}.properties/yml
默认使用application.properties的配置
2.yml支持多文档块方式
1 | |
3.激活指定profile
1 | |
@profile


@Profile也可以标在配置类上,整个类只有在指定的生产环境下才能生效

命令行激活(可以修改配置文件任意值,以命令行优先):
1 | |
可以直接在测试的时候,配置传入命令行参数–spring.profiles.active=prod
虚拟机参数:
-Dspring.profiles.active=prod
7.配置文件加载位置
spring boot启动时会扫描以下位置的application.properties或者application.yml文件作为spring boot的默认配置文件
-file(项目文件):/config/
-file:/
-classpath(resource):/config/
-classpath:/
优先级由高到低,高优先级的会覆盖低优先级的配置;
springboot会从这四个位置全部加载成主配置文件;互补配置
我们还可以通过spring.config.location来改变默认的配置文件位置
项目打包好以后,我们可以使用命令行参数的形式,启动项目的时候来指定配置文件的新位置;指定配置文件和默认的这些配置文件共同起作用形成互补配置;(springboot2.4.3实测没有互补)
8.外部配置加载顺序
springboot也可以从以下位置加载配置;优先级从高到低;高优先级的配置覆盖低优先级的配置,所有的配置会形成互补配置
1.命令行参数
java -jar project4-0.0.1-SNAPSHOT.jar –server.port=8086 –server.servlet.context-path=/abc
多个配置用空格分开 –配置项=值
2.来自java:comp/env的JNDI属性
3.Java系统属性(System.getProperties())
4.操作系统环境变量
5.RandomValuePropertySource配置的random.*属性值
由jar包外向jar包内进行寻找;
优先加载带profile的
6.jar包外部的application-{profiles}.properties或application.yml(带spring.profile)配置文件
7.jar包内部的application-{profiles}.properties或application.yml(带spring.profile)配置文件
8.jar包外部的application.properties或application.yml(不带spring.profile)配置文件
9.jar包内部的application.properties或application.yml(不带spring.profile)配置文件
10.@Configuration注解类上的@PropertySource
11.通过SpringApplication.setDefaultProperties指定的默认属性
所有支持的配置加载来源;
[参考官方文档](
五、web开发(源码以后再看)
1、SpringMVC自动配置概览
Spring Boot provides auto-configuration for Spring MVC that works well with most applications.(大多场景我们都无需自定义配置)
The auto-configuration adds the following features on top of Spring’s defaults:
Inclusion of
ContentNegotiatingViewResolverandBeanNameViewResolverbeans.- 内容协商视图解析器和BeanName视图解析器
Support for serving static resources, including support for WebJars (covered later in this document)).
- 静态资源(包括webjars)
Automatic registration of
Converter,GenericConverter, andFormatterbeans.- 自动注册
Converter,GenericConverter,Formatter
- 自动注册
Support for
HttpMessageConverters(covered later in this document).- 支持
HttpMessageConverters(后来我们配合内容协商理解原理)
- 支持
Automatic registration of
MessageCodesResolver(covered later in this document).- 自动注册
MessageCodesResolver(国际化用)
- 自动注册
Static
index.htmlsupport.- 静态index.html 页支持
Custom
Faviconsupport (covered later in this document).- 自定义
Favicon
- 自定义
Automatic use of a
ConfigurableWebBindingInitializerbean (covered later in this document).- 自动使用
ConfigurableWebBindingInitializer,(DataBinder负责将请求数据绑定到JavaBean上)
- 自动使用
If you want to keep those Spring Boot MVC customizations and make more MVC customizations (interceptors, formatters, view controllers, and other features), you can add your own
@Configurationclass of typeWebMvcConfigurerbut without@EnableWebMvc.不用@EnableWebMvc注解。使用
@Configuration+WebMvcConfigurer自定义规则
If you want to provide custom instances of
RequestMappingHandlerMapping,RequestMappingHandlerAdapter, orExceptionHandlerExceptionResolver, and still keep the Spring Boot MVC customizations, you can declare a bean of typeWebMvcRegistrationsand use it to provide custom instances of those components.声明
WebMvcRegistrations改变默认底层组件
If you want to take complete control of Spring MVC, you can add your own
@Configurationannotated with@EnableWebMvc, or alternatively add your own@Configuration-annotatedDelegatingWebMvcConfigurationas described in the Javadoc of@EnableWebMvc.使用
@EnableWebMvc+@Configuration+DelegatingWebMvcConfiguration 全面接管SpringMVC
2.简单功能分析
2.1静态资源访问
静态资源目录
只要将静态资源放在类路径下: called /static (or /public or /resources or /META-INF/resources
访问:当前项目根路径/+静态资源名
原理:静态映射/**。
请求进来,先去找Controller看能不能处理。不能处理的所有请求又都交给静态资源处理器。静态资源也找不到则响应404页面。
静态资源访问前缀
默认无前缀
1 | |
webjar
自动映射 /webjars/**
1 | |
访问地址:http://localhost:8080/webjars/jquery/3.5.1/jquery.js 后面地址要按照依赖里面的包路径
2.2、欢迎页支持
2.3、自定义 Favicon
2.4、静态资源配置原理
25集
3、请求参数处理
1、rest使用与原理
@xxxMapping;
Rest风格支持(使用*HTTP*请求方式动词来表示对资源的操作)
- 以前:**/getUser 获取用户 /deleteUser 删除用户 /editUser 修改用户 /saveUser 保存用户
- 现在: /user GET-**获取用户 DELETE-**删除用户 PUT-**修改用户 POST-**保存用户
- 核心Filter;HiddenHttpMethodFilter
用法: 表单method=post,隐藏域 _method=put
1
2
3
4
5
6
7
8
9
10
11
12
13
14
15
16
17
18
19
20
21
22
23
24
25
26
27
28
29
30
31
32
33<h1>测试rest风格</h1>>
<form action="/user" method="get" >
<input type="submit" value="GET">
</form>
<form action="/user" method="post" >
<input type="submit" value="POST">
</form>
<form action="/user" method="post" >
<input name="_method" type="hidden" value="PUT">
<input type="submit" value="PUT">
</form>
<form action="/user" method="post" >
<input name="_method" type="hidden" value="DELETE">
<input type="submit" value="DELETE">
</form>
//controller:
@RequestMapping(value = "/user",method = RequestMethod.GET)
public Object get(){
return "GET";
}
@RequestMapping(value = "/user",method = RequestMethod.POST)
public Object post(){
return "POST";
}
@RequestMapping(value = "/user",method = RequestMethod.PUT)
public Object put(){
return "PUT";
}
@RequestMapping(value = "/user",method = RequestMethod.DELETE)
public Object delete(){
return "DELETE";
}
- SpringBoot中手动开启
1
2
3
4
5
spring:
mvc:
hiddenmethod:
filter:
enabled: true
- 扩展:如何把_method 这个名字换成我们自己喜欢的。
REST原理:26集
2.请求映射原理
28集
2、普通参数与基本注解
1.1、注解:
@PathVariable(路径变量)、@RequestHeader(获取请求头)、@ModelAttribute()、@RequestParam(获取请求参数)、@MatrixVariable(矩阵变量)31集,@CookieValue(获取cookie值)、@RequestBody(获取请求体[post])、@RequestAttribute(获取request域属性)
1.2、Servlet API:
WebRequest、ServletRequest、MultipartRequest、 HttpSession、javax.servlet.http.PushBuilder、Principal、InputStream、Reader、HttpMethod、Locale、TimeZone、ZoneId
1.3、复杂参数:
Map、Model(map、model里面的数据会被放在request的请求域 request.setAttribute)、Errors/BindingResult、RedirectAttributes( 重定向携带数据)、ServletResponse(response)、SessionStatus、UriComponentsBuilder、ServletUriComponentsBuilder
3.thymeleaf
4.拦截器
1 | |
1 | |
5.文件上传
6.异常处理
7.Web原生组件注入(servlet,Filter,Listener)
六、数据访问
1.整合druid数据源
1.1自定义方式
1.2使用官方starter方式
2.整合Mybatis
2.1、配置模式
- 导入mybatis-starter
1 | |
- 创建全局配置文件和mapper映射文件

1 | |
1 | |
在yaml配置文件中配置mybatis规则
1
2
3mybatis:
config-location: classpath:mybatis/mybatis-config.xml #mybatis全局配置文件位置
mapper-locations: classpath:mybatis/mapper/*.xml #mapper配置文件位置编写mapper接口和service业务类
3、整合Mybatis-Plus
引入Mybatis-Plus依赖
1
2
3
4
5<dependency>
<groupId>com.baomidou</groupId>
<artifactId>mybatis-plus-boot-starter</artifactId>
<version>Latest Version</version>
</dependency>
配置数据库相关的配置
1
2
3
4
5
6#datasource的父级是spring
datasource:
url: jdbc:mysql://localhost:3306/book
username: root
password: 123456
driver-class-name: com.mysql.cj.jdbc.Driver在 Spring Boot 启动类中添加
@MapperScan注解,扫描 Mapper 文件夹:1
@MapperScan("com.project.project6.mapper")编写实体类,mapper接口,以及业务逻辑层
- 实体类
1
2
3
4
5
6
7
8
9
10
11
12
13
14@Data
@AllArgsConstructor
@NoArgsConstructor
public class User {
@TableField(exist = false) //代表表中不存在的字段
private String username;
@TableField(exist = false)
private String password;
private Long id;
private String name;
private Integer age;
private String email;
}mapper接口
1
2public interface UserMapper extends BaseMapper<User> {
} //继承Mybatis-Plus提供的BaseMapper接口。
业务逻辑层
service
1
2public interface UserService extends IService<User> {
} //继承Mybatis-Plus提供的IService接口。serviceImpl
1
2
3@Service
public class UserServiceImpl extends ServiceImpl<UserMapper,User> implements UserService {
} //继承Mybatis-Plus提供的ServiceImpl接口。
分页使用
- 导入分页插件
1
2
3
4
5
6
7
8
9
10
11
12
13
14@Configuration
public class MybatisPlusConfig {
@Bean
public MybatisPlusInterceptor mybatisPlusInterceptor() {
MybatisPlusInterceptor interceptor = new MybatisPlusInterceptor();
interceptor.addInnerInterceptor(new PaginationInnerInterceptor(DbType.MYSQL));
return interceptor;
}
@Bean
public ConfigurationCustomizer configurationCustomizer() {
return configuration -> configuration.setUseDeprecatedExecutor(false);
}
}
测试
1
2
3
4
5@GetMapping("/user")
public Object getUser(@RequestParam(value = "pn",defaultValue = "1")Integer pn){
Page<User> page = new Page<User>(pn,2);
return userService.page(page);
}
4.整合Redis
导入依赖并编写配置文件
1
2
3
4
5
6
7
8<dependency>
<groupId>org.springframework.boot</groupId>
<artifactId>spring-boot-starter-data-redis</artifactId>
</dependency> //redis依赖
<dependency>
<groupId>redis.clients</groupId>
<artifactId>jedis</artifactId>
</dependency> //jedis依赖1
2
3
4
5redis:
host: 127.0.0.1 //redis地址
password: 123456 //密码
port: 6379 //端口号
client-type: jedis //工厂类型
注入StringRedisTemplate组件来操作redis
1
2
3
4@Autowired
StringRedisTemplate stringRedisTemplate;
@Autowired
RedisConnectionFactory redisConnectionFactory; //查看当前连接工厂调用opsForValue方法来进行操作
1 | |
2.使用redis实现统计功能
- 编写一个拦截器,请求一次就统计一次
1 | |
1 | |
controller测试
1
2
3
4
5
6
7
8
9
10
11@Autowired
StringRedisTemplate stringRedisTemplate;
@GetMapping("main.html")
public String totle(Model model){
ValueOperations<String, String> operations = stringRedisTemplate.opsForValue();
String cat = operations.get("/cat");
String city = operations.get("/city");
model.addAttribute("cat",cat);
model.addAttribute("city",city);
return "index.html";
}七、单元测试
1、JUnit5 的变化
Spring Boot 2.2.0 版本开始引入 JUnit 5 作为单元测试默认库
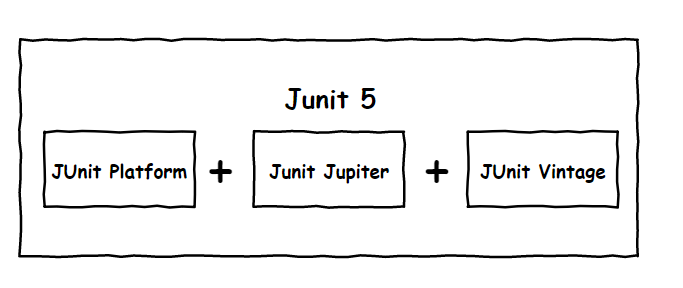
作为最新版本的JUnit框架,JUnit5与之前版本的Junit框架有很大的不同。由三个不同子项目的几个不同模块组成。
JUnit 5 = JUnit Platform + JUnit Jupiter + JUnit Vintage
JUnit Platform: Junit Platform是在JVM上启动测试框架的基础,不仅支持Junit自制的测试引擎,其他测试引擎也都可以接入。
JUnit Jupiter: JUnit Jupiter提供了JUnit5的新的编程模型,是JUnit5新特性的核心。内部 包含了一个测试引擎,用于在Junit Platform上运行。
JUnit Vintage: 由于JUint已经发展多年,为了照顾老的项目,JUnit Vintage提供了兼容JUnit4.x,Junit3.x的测试引擎。

注意:
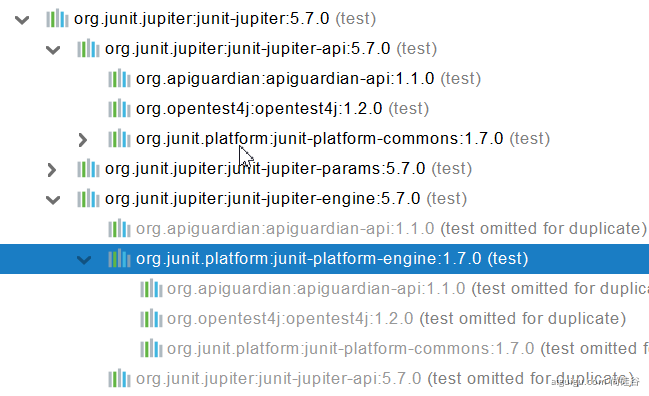
SpringBoot 2.4 以上版本移除了默认对 Vintage 的依赖。如果需要兼容junit4需要自行引入(不能使用junit4的功能 @Test)
JUnit 5’s Vintage Engine Removed from
spring-boot-starter-test,如果需要继续兼容junit4需要自行引入vintage1
2
3
4
5
6
7
8
9
10
11<dependency>
<groupId>org.junit.vintage</groupId>
<artifactId>junit-vintage-engine</artifactId>
<scope>test</scope>
<exclusions>
<exclusion>
<groupId>org.hamcrest</groupId>
<artifactId>hamcrest-core</artifactId>
</exclusion>
</exclusions>
</dependency>**
**
1 | |
现在版本:
1 | |
以前:
@SpringBootTest + @RunWith(SpringTest.class)
SpringBoot整合Junit以后。
- 编写测试方法:@Test标注(注意需要使用junit5版本的注解)
- Junit类具有Spring的功能,@Autowired、比如 @Transactional 标注测试方法,测试完成后自动回滚
2、JUnit5常用注解
JUnit5的注解与JUnit4的注解有所变化
https://junit.org/junit5/docs/current/user-guide/#writing-tests-annotations
@Test :表示方法是测试方法。但是与JUnit4的@Test不同,他的职责非常单一不能声明任何属性,拓展的测试将会由Jupiter提供额外测试
@ParameterizedTest :表示方法是参数化测试,下方会有详细介绍
@RepeatedTest :表示方法可重复执行,下方会有详细介绍
@DisplayName :为测试类或者测试方法设置展示名称
@BeforeEach :表示在每个单元测试之前执行
@AfterEach :表示在每个单元测试之后执行
@BeforeAll :表示在所有单元测试之前执行
@AfterAll :表示在所有单元测试之后执行
@Tag :表示单元测试类别,类似于JUnit4中的@Categories
@Disabled :表示测试类或测试方法不执行,类似于JUnit4中的@Ignore
@Timeout :表示测试方法运行如果超过了指定时间将会返回错误
@ExtendWith :为测试类或测试方法提供扩展类引用
1
2
3
4
5
6
7
8
9
10import org.junit.jupiter.api.Test; //注意这里使用的是jupiter的Test注解!!
public class TestDemo {
@Test
@DisplayName("第一次测试")
public void firstTest() {
System.out.println("hello world");
}
3、断言(assertions)
断言(assertions)是测试方法中的核心部分,用来对测试需要满足的条件进行验证。这些断言方法都是 org.junit.jupiter.api.Assertions 的静态方法。JUnit 5 内置的断言可以分成如下几个类别:
检查业务逻辑返回的数据是否合理。
所有的测试运行结束以后,会有一个详细的测试报告;
1、简单断言
用来对单个值进行简单的验证。如:
| 方法 | 说明 |
|---|---|
| assertEquals | 判断两个对象或两个原始类型是否相等 |
| assertNotEquals | 判断两个对象或两个原始类型是否不相等 |
| assertSame | 判断两个对象引用是否指向同一个对象 |
| assertNotSame | 判断两个对象引用是否指向不同的对象 |
| assertTrue | 判断给定的布尔值是否为 true |
| assertFalse | 判断给定的布尔值是否为 false |
| assertNull | 判断给定的对象引用是否为 null |
| assertNotNull | 判断给定的对象引用是否不为 null |
1 | |
2、数组断言
通过 assertArrayEquals 方法来判断两个对象或原始类型的数组是否相等
1 | |
3、组合断言
assertAll 方法接受多个 org.junit.jupiter.api.Executable 函数式接口的实例作为要验证的断言,可以通过 lambda 表达式很容易的提供这些断言
1 | |
4、异常断言
在JUnit4时期,想要测试方法的异常情况时,需要用@Rule注解的ExpectedException变量还是比较麻烦的。而JUnit5提供了一种新的断言方式Assertions.assertThrows() ,配合函数式编程就可以进行使用。
1 | |
5、超时断言
Junit5还提供了Assertions.assertTimeout() 为测试方法设置了超时时间
1 | |
6、快速失败
通过 fail 方法直接使得测试失败
1 | |
4、前置条件(assumptions)
JUnit 5 中的前置条件(assumptions【假设】)类似于断言,不同之处在于不满足的断言会使得测试方法失败,而不满足的前置条件只会使得测试方法的执行终止。前置条件可以看成是测试方法执行的前提,当该前提不满足时,就没有继续执行的必要。
1 | |
assumeTrue 和 assumFalse 确保给定的条件为 true 或 false,不满足条件会使得测试执行终止。assumingThat 的参数是表示条件的布尔值和对应的 Executable 接口的实现对象。只有条件满足时,Executable 对象才会被执行;当条件不满足时,测试执行并不会终止。
5、嵌套测试
JUnit 5 可以通过 Java 中的内部类和@Nested 注解实现嵌套测试,从而可以更好的把相关的测试方法组织在一起。在内部类中可以使用@BeforeEach 和@AfterEach 注解,而且嵌套的层次没有限制。
1 | |
6、参数化测试
参数化测试是JUnit5很重要的一个新特性,它使得用不同的参数多次运行测试成为了可能,也为我们的单元测试带来许多便利。
利用@ValueSource等注解,指定入参,我们将可以使用不同的参数进行多次单元测试,而不需要每新增一个参数就新增一个单元测试,省去了很多冗余代码。
**
**
@ValueSource: 为参数化测试指定入参来源,支持八大基础类以及String类型,Class类型
@NullSource: 表示为参数化测试提供一个null的入参
@EnumSource: 表示为参数化测试提供一个枚举入参
@CsvFileSource:表示读取指定CSV文件内容作为参数化测试入参
@MethodSource:表示读取指定方法的返回值作为参数化测试入参(注意方法返回需要是一个流)
当然如果参数化测试仅仅只能做到指定普通的入参还达不到让我觉得惊艳的地步。让我真正感到他的强大之处的地方在于他可以支持外部的各类入参。如:CSV,YML,JSON 文件甚至方法的返回值也可以作为入参。只需要去实现ArgumentsProvider接口,任何外部文件都可以作为它的入参。
1 | |
7、迁移指南
在进行迁移的时候需要注意如下的变化:
- 注解在 org.junit.jupiter.api 包中,断言在 org.junit.jupiter.api.Assertions 类中,前置条件在 org.junit.jupiter.api.Assumptions 类中。
- 把@Before 和@After 替换成@BeforeEach 和@AfterEach。
- 把@BeforeClass 和@AfterClass 替换成@BeforeAll 和@AfterAll。
- 把@Ignore 替换成@Disabled。
- 把@Category 替换成@Tag。
- 把@RunWith、@Rule 和@ClassRule 替换成@ExtendWith。
八、指标监控
1、SpringBoot Actuator
1、简介
未来每一个微服务在云上部署以后,我们都需要对其进行监控、追踪、审计、控制等。SpringBoot就抽取了Actuator场景,使得我们每个微服务快速引用即可获得生产级别的应用监控、审计等功能。
1 | |

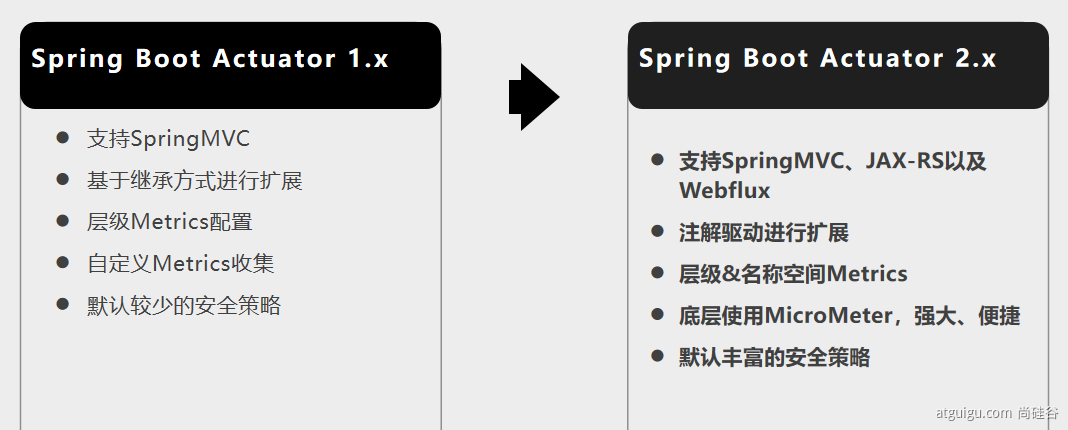
2、1.x与2.x的不同
3、如何使用
- 引入场景
- 访问 http://localhost:8080/actuator/**
- 暴露所有监控信息为HTTP
1 | |
- 测试
http://localhost:8080/actuator/beans
http://localhost:8080/actuator/configprops
http://localhost:8080/actuator/metrics
http://localhost:8080/actuator/metrics/jvm.gc.pause
http://localhost:8080/actuator/endpointName/detailPath
。。。。。。
4、可视化
https://github.com/codecentric/spring-boot-admin
编写一个服务器项目,专门用来监控客户端
然后导入依赖
1
2
3
4
5
6
7
8
9<dependency>
<groupId>org.springframework.boot</groupId>
<artifactId>spring-boot-starter-web</artifactId>
</dependency>
<dependency>
<groupId>de.codecentric</groupId>
<artifactId>spring-boot-admin-starter-server</artifactId>
<version>2.3.1</version>
</dependency> #可视化工具依赖,需搭配web依赖使用在主程序上编写@EnableAdminServer
1
2
3
4
5
6
7
8
9@EnableAdminServer
@SpringBootApplication
public class ProjectadminserviceApplication {
public static void main(String[] args) {
SpringApplication.run(ProjectadminserviceApplication.class, args);
}
}端口号不能与客户端一致
在客户端引入依赖
1
2
3
4
5<dependency>
<groupId>de.codecentric</groupId>
<artifactId>spring-boot-admin-starter-client</artifactId>
<version>2.3.1</version>
</dependency>在编写配置文件和服务器项目对应
1
2
3
4
5
6
7
8
9spring
boot:
admin:
client:
url: http://localhost:8081 #对应服务器端项目的端口
instance:
prefer-ip: true #使用IP注册进来,不然注册进去的会是电脑名字
application:
name: project6 #表明当前项目名实例化页面

一个六边形代表一个项目,12m表示运行了12分钟

2、Actuator Endpoint
1、最常使用的端点
| ID | 描述 |
|---|---|
auditevents |
暴露当前应用程序的审核事件信息。需要一个AuditEventRepository组件。 |
beans |
显示应用程序中所有Spring Bean的完整列表。 |
caches |
暴露可用的缓存。 |
conditions |
显示自动配置的所有条件信息,包括匹配或不匹配的原因。 |
configprops |
显示所有@ConfigurationProperties。 |
env |
暴露Spring的属性ConfigurableEnvironment |
flyway |
显示已应用的所有Flyway数据库迁移。 需要一个或多个Flyway组件。 |
health |
显示应用程序运行状况信息。 |
httptrace |
显示HTTP跟踪信息(默认情况下,最近100个HTTP请求-响应)。需要一个HttpTraceRepository组件。 |
info |
显示应用程序信息。 |
integrationgraph |
显示Spring integrationgraph 。需要依赖spring-integration-core。 |
loggers |
显示和修改应用程序中日志的配置。 |
liquibase |
显示已应用的所有Liquibase数据库迁移。需要一个或多个Liquibase组件。 |
metrics |
显示当前应用程序的“指标”信息。 |
mappings |
显示所有@RequestMapping路径列表。 |
scheduledtasks |
显示应用程序中的计划任务。 |
sessions |
允许从Spring Session支持的会话存储中检索和删除用户会话。需要使用Spring Session的基于Servlet的Web应用程序。 |
shutdown |
使应用程序正常关闭。默认禁用。 |
startup |
显示由ApplicationStartup收集的启动步骤数据。需要使用SpringApplication进行配置BufferingApplicationStartup。 |
threaddump |
执行线程转储。 |
如果您的应用程序是Web应用程序(Spring MVC,Spring WebFlux或Jersey),则可以使用以下附加端点:
| ID | 描述 |
|---|---|
heapdump |
返回hprof堆转储文件。 |
jolokia |
通过HTTP暴露JMX bean(需要引入Jolokia,不适用于WebFlux)。需要引入依赖jolokia-core。 |
logfile |
返回日志文件的内容(如果已设置logging.file.name或logging.file.path属性)。支持使用HTTPRange标头来检索部分日志文件的内容。 |
prometheus |
以Prometheus服务器可以抓取的格式公开指标。需要依赖micrometer-registry-prometheus。 |
最常用的Endpoint
- Health:监控状况
- Metrics:运行时指标
- Loggers:日志记录
2、Health Endpoint
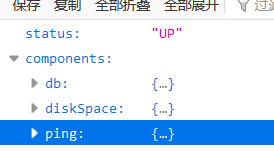
健康检查端点,我们一般用于在云平台,平台会定时的检查应用的健康状况,我们就需要Health Endpoint可以为平台返回当前应用的一系列组件健康状况的集合。
重要的几点:
health endpoint返回的结果,应该是一系列健康检查后的一个汇总报告
很多的健康检查默认已经自动配置好了,比如:数据库、redis等
可以很容易的添加自定义的健康检查机制
1
2
3endpoint:
health:
show-details: always //开启详细的健康检查报告
3、Metrics Endpoint
提供详细的、层级的、空间指标信息,这些信息可以被pull(主动推送)或者push(被动获取)方式得到;
- 通过Metrics对接多种监控系统
- 简化核心Metrics开发
- 添加自定义Metrics或者扩展已有Metrics
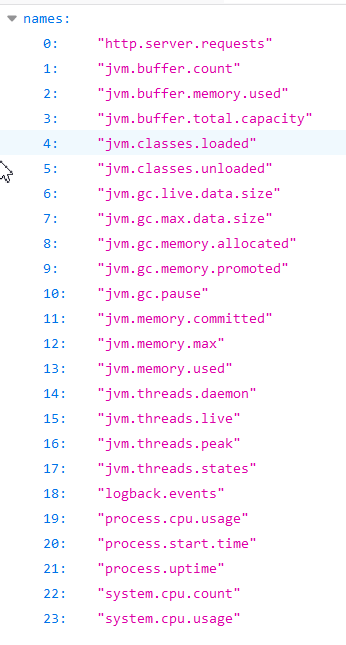
4、管理Endpoints
1、开启与禁用Endpoints
- 默认所有的Endpoint除过shutdown都是开启的。
- 需要开启或者禁用某个Endpoint。配置模式为 management.endpoint.**
**.enabled = true
1 | |
- 或者禁用所有的Endpoint然后手动开启指定的Endpoint
1 | |
2、暴露Endpoints
支持的暴露方式
- HTTP:默认只暴露health和info Endpoint
- JMX:默认暴露所有Endpoint
- 除过health和info,剩下的Endpoint都应该进行保护访问。如果引入SpringSecurity,则会默认配置安全访问规则
| ID | JMX | Web |
|---|---|---|
auditevents |
Yes | No |
beans |
Yes | No |
caches |
Yes | No |
conditions |
Yes | No |
configprops |
Yes | No |
env |
Yes | No |
flyway |
Yes | No |
health |
Yes | Yes |
heapdump |
N/A | No |
httptrace |
Yes | No |
info |
Yes | Yes |
integrationgraph |
Yes | No |
jolokia |
N/A | No |
logfile |
N/A | No |
loggers |
Yes | No |
liquibase |
Yes | No |
metrics |
Yes | No |
mappings |
Yes | No |
prometheus |
N/A | No |
scheduledtasks |
Yes | No |
sessions |
Yes | No |
shutdown |
Yes | No |
startup |
Yes | No |
threaddump |
Yes | No |
3.定制化Endpoints
1.定制health信息
1 | |

2.定制info
yaml配置文件方式
1
2
3
4
5info:
appName: Project6
hello: world
mavenProjectName: @project.artifactId@ #使用@@可以获取maven的pom文件值
mavenVersoin: @project.version@

配置类方式
1
2
3
4
5
6
7
8@Component
public class AppInfoInfoContributor implements InfoContributor {
@Override
public void contribute(Info.Builder builder) {
builder.withDetail("redis实例","redis实例化成功")
.withDetail("Redis工厂类型","jedis");
}
}

3.定制Metrics信息
1 | |


4.定制Endpoint
1 | |

九、自定义Starter
- 创建一个空工程

在工厂中创建两个模块
- 上面是maven模块来编写场景启动器,给别人引用 /下面是springboot模块负责编写自动配置相关的东西。

在场景启动器中引入自动配置的依赖
1
2
3
4
5
6
7
8
9
10<groupId>com.project</groupId>
<artifactId>project-hello-spring-boot-starter</artifactId>
<version>1.0-SNAPSHOT</version>
<dependencies>
<dependency>
<groupId>com.project</groupId>
<artifactId>project-hello-spring-boot-starter-autoconfigure</artifactId>
<version>0.0.1-SNAPSHOT</version>
</dependency>
</dependencies>删除自动配置里面没用的东西
- pom.xml文件里面只留下spring-boot-starter即可
1 | |
删掉项目里没有的类和配置文件(蓝色背景的都删除)

编写一个自动配置方法
service包下的PostService类
1
2
3
4
5
6
7
8
9
10
11
12
13
/**
* 默认不放在容器中
*/
public class PostService {
@Autowired
PostProperties postProperties;
public String introDuce(){
return postProperties.getName()+"是一个"+postProperties.getPosition();
}
}
bean包下的PostProperties类
1
2
3
4
5@ConfigurationProperties("project.post")
public class PostProperties {
private String name;
private String position;
//省略get,set方法
auto包下的PostServiceAutoConfiguration类
1
2
3
4
5
6
7
8
9
10
11
12@Configuration
@ConditionalOnMissingBean(PostService.class) //条件装配,你没有这个组件就自动注入
@EnableConfigurationProperties(PostProperties.class) //默认将PostProperties放在容器中
public class PostServiceAutoConfiguration {
@Bean
public PostService postService(){
PostService postService = new PostService();
return postService;
}
}
编写META-INF/spring.factories中EnableAutoConfiguration 的值,使得项目启动加载指定的自动配置类**

1
2
3# Auto Configure
org.springframework.boot.autoconfigure.EnableAutoConfiguration=\
com.project.auto.PostServiceAutoConfiguration将模块安装到maven目录中先安装自动装配模块

在新项目中引入自定义的Starter
1
2
3
4
5<dependency>
<groupId>com.project</groupId>
<artifactId>project-hello-spring-boot-starter</artifactId>
<version>1.0-SNAPSHOT</version>
</dependency>引入成功就可以使用了
1
2
3
4project:
post:
name: 张三
position: 经理1
2
3
4
5
6
7@Autowired
PostService postService;
@GetMapping("/introDuce")
public String getIntroDuce(){
String s = postService.introDuce();
return s;
}
效果

十、SpringBoot原理(以后再看)
- Post title:SpringBoot 知识汇总
- Post author:周瑜
- Create time:2021-03-07 18:25:55
- Post link:https://xinblog.github.io/2021/03/07/Springboot2-md/
- Copyright Notice:All articles in this blog are licensed under BY-NC-SA unless stating additionally.


